Pros and Cons
Before painting, it is important to evaluate the advantages and disadvantages of this type of wall decoration.
What kind of paint can I use?
Since the bathroom has high humidity and regular temperature changes, you need to approach the choice of suitable paint carefully. Let’s first consider the basic requirements for finishing materials for the bathroom:
- Moisture resistance;
- Vapor permeability;
- Antiseptic properties;
- Environmental friendliness.
Now I will give recommendations on choosing paint, and then I will tell you about the different types and their features.
In addition to appearance, paints differ in their chemical composition, and accordingly have different qualities. To ensure that the paint on your walls lasts as long as possible and does not cause you problems, consider my recommendations:
- Paint can vary not only in color but also in texture. Matte paint hides small wall imperfections and gives greater depth of color, but is difficult to maintain. Glossy paint will reveal all surface defects, and fingerprints and plaque will also be visible on it. But such compositions are usually stronger and easier to wash.
- Not all types tolerate moisture well. Therefore, choose moisture-resistant compositions so that the repair does not deteriorate after the first shower. The best option is acrylic paint.
- To avoid mold and mildew, the composition must contain antiseptic additives. This is easy to check – ask a consultant in the store or look at the packaging (there should be appropriate markings).
- The walls in the bathroom should “breathe”. This will prevent mold from forming.
Important! Painting is only allowed in a bathroom with good ventilation. This will prevent the appearance of fungus and mold.
Acrylic
Contains acrylate resins and is even used for house facades.
- It is not afraid of high humidity, but at the same time creates a film that allows air to pass through. It is resistant to dirt, but if a stain gets on the surface, it can be easily cleaned with a damp sponge.
- Dries in a couple of hours, is non-toxic, and has no unpleasant odor. The price is high, but acrylic paint is economical due to its high adhesion.

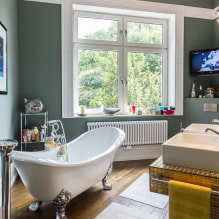
The photo shows walls in a wet area painted with acrylic paint.
Alkyd
When dry, it forms a film that repels water. But this same film does not allow air to pass through, which means the walls will not be able to breathe.
- Contains resins and solvent, hence another disadvantage – a strong smell and toxicity. Having chosen it for repair, all work should be carried out in a respirator and the bathroom should be actively ventilated.
- The disadvantages can be offset by the low cost and good antibacterial properties.

Water-based
Water-based paint – no solvents are needed to dilute it, just clean water. Completely safe, no toxins in the composition, the smell when using is weak and does not cause discomfort. Dries quickly and is durable.
It adheres best to concrete and plaster. The surface painted with it is afraid of direct contact with water. But if you choose a water-based paint with latex in its composition, you can wash the wall and use gentle household chemicals.

Oil-based
In Soviet times, everything was painted with it (from entrances to bathrooms), now it is almost never used. The cheapest option. It takes more than a day to dry and has a very strong smell.
Over time, cracks and peeling appear on it, so oil paint can only be used as a last resort.

Silicate
Paint based on liquid glass with additives and hardeners. Pros: good adhesion to the plastered surface and increased moisture resistance. Minus: poor color palette.

Enamel
In addition to the alkyd enamel described above, there are other varieties. Nitro enamel based on cellulose nitrate contains such toxic components that it is even banned in some countries.
Polyurethane and epoxy enamel are suitable for painting walls. They have good adhesion and are difficult to scratch. Epoxy enamel is even used to coat the bathtub itself.
It is important to remember safety precautions and use a respirator.

Textured
Very dense. If there are defects on the walls of the bathroom (up to two millimeters deep), textured paint will help to hide the flaws without additional surface leveling. Acrylic in the composition makes it durable and does not allow moisture to pass through, the wall can be washed with a soap solution.
The scope for creativity in working with this paint is limitless. Using different fillers, you can create interesting textures.
- With sawdust, the surface will look embossed.
- By adding quartz sand, you will get sharp corners.
- A rope wound on a roller will draw stems of bizarre plants.
- Unusual patterns are cut out with a spatula.
- You can do them just with your hands, it all depends on your imagination.

How to calculate consumption?
Before you start painting the bathroom, it is important to prepare all the materials. Therefore, first we need to calculate the required amount of paint. Consumption depends on several criteria:
- type and hiding power of paint,
- type and area of the surface to be painted.
Measure the area of the walls in the bathroom. Calculate how much paint you need based on the information on the label, add 10-15% of the resulting amount in reserve. Consumption is usually indicated on the packaging, but just in case, I will duplicate the table of average values below:
If the surface is porous or has minor irregularities, then it is worth laying an additional 20% to the total volume.
Which color to choose?
It is better to paint a small bathroom or a combined toilet in light colors. This is a well-known trick that will help visually expand the space. Such shades look good in combination with traditional white plumbing. In a spacious bathroom, you can implement any ideas – contrasting shapes, geometry, ornaments, different types of finishing.
Important: splash marks are more visible on dark surfaces.
Matte paint will hide small flaws better, but it is impossible to remove dirt from it without leaving a trace. If you decide on it, dark shades are preferable.
Glossy paint, on the contrary, will highlight all the flaws of the surface, it should be perfectly smooth and clean. But the walls painted with it are easy to wash and you are not limited in the choice of color.
The style of your bathroom interior also dictates some rules in choosing the color of the wall decoration. Cool gray glossy walls and all shades of blue or brown will look good in a modern bathroom.


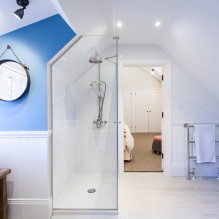
The photo shows a high-tech bathroom with painted walls
White or gray is the best color for the Scandinavian style. For practicality, you can decorate the bottom or wet areas with tiles.


As for the loft, there are no restrictions – terracotta, black or gray, as well as light or bright colors are relevant. If you decide to choose light colors, then be sure to additionally emphasize the brutality of the interior.


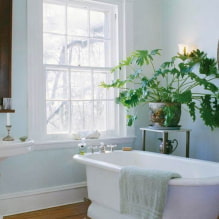
Neutral pastel colors will fit well into Provence and classics – powder pink, sand, light green.


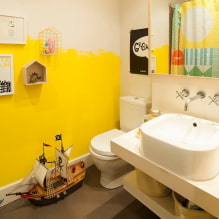
Bright accents and geometry are suitable for pop art and art deco.
These are just general rules and you have the right to do everything your own way.

What is the best paint?
There are three ways to paint walls:
- A brush has the highest paint consumption, plus the paint can “streak”. But a brush is indispensable for painting corners.
- Applying paint with a roller provides a more even coating. But it is important to consider the surface condition. For example, for uneven walls with minor defects, it is better to choose a roller with a long pile. Choose the roller width based on the surface area.
- The spray gun sprays paint onto the wall, making the coating thin and even. In addition, the process will go much faster with it. It is important to wash it thoroughly and put on a respirator and glasses for protection.


How to paint yourself?
The most popular way to paint walls is a combination – a roller and a brush. That is why I will show detailed instructions with these tools.
Before starting work, you need to prepare the necessary tools and materials:
- paint;
- putty;
- primer;
- sandpaper;
- film to protect plumbing and floors;
- paper tape;
- protective equipment (respirator, safety glasses and gloves);
- tray;
- rollers of different sizes;
- brush.
If everything you need is available, you can start painting the walls.

How to properly prepare the walls?
Paint will only adhere well to a perfectly prepared surface, so minor repairs are unavoidable.
Check out our article on removing old paint from a wall.
- Remove the old coating. If it is tiles, knock them down and remove the remaining mortar.
- Clean the walls to get rid of dust and dirt.
- If the surface has significant differences and unevenness, then you will have to level everything with plaster.
- If there are small defects and cracks on the wall, repair and putty them first. Let it dry and only then treat the entire wall. It is important to choose a waterproof filler (e.g. latex-based).
- After it has completely dried, sand it to remove any uneven areas.
- Remove any remaining material and dust particles from the surface using a damp cloth and broom.
- Carefully prime the walls with a waterproofing compound according to the instructions. A new layer cannot be applied until the previous one is completely dry.


Step-by-step instructions
The surface is prepared, you can start painting.
Tip! It is better to pour all the paint you are going to use into a large container and mix it. Paint of the same color from different cans may differ in nuances. By mixing them together, you will get a uniform shade.
- Remove the covers from sockets and switches, seal them with masking tape. Do not forget to de-energize them before doing this.
- Also seal the borders of the walls with the floor and ceiling with tape. Place a film on the floor to protect it.
- Stir the paint until there are no lumps. If you added colorant, make sure there are no streaks.
- Pour it into a tray.
- Use a brush to paint the corners and hard-to-reach places.
- Dip the roller into the tray and roll it several times so that the paint is evenly distributed without gaps.
- Start painting from the corner so that each strip overlaps the previous one by 2-3 cm.
- Start applying the second layer only after the first one has completely dried.
- Remove the tape before the paint dries, otherwise it will come off with it.


Video
Beautiful design ideas
Use different paint application techniques to get interesting effects.
Use different rollers, you can make textured painting or patterns with them.


You can achieve the effect of chaotic strokes if you wrap a regular roller with fabric in several layers or just take a piece of fabric. Also try applying a different color paint on top of the first layer with crumpled paper.


Apply patterns using a stencil or do some freehand drawing.


If desired, you can imitate other building materials. For example, brickwork can be easily replicated using a simple sponge.

Textured painting looks no less stylish – it looks stylish and does not require additional elements.

The photo shows textured painting in the bathroom.
Monochrome painted walls will fit into a bathroom in any style. And if necessary, you can add a picture or bright decor.

The photo shows a bathroom in Scandi style with painted walls


If plain walls seem boring to you, consider a combination finish. The wet area is finished with tiles or wood, and the rest of the walls are painted.
The most popular solution for the bathroom is tiles and paint. For private houses, wooden panels or clapboards are used. Check out the ideas below, which are not only stylish, but also practical.


Painting the walls in the bathroom is definitely worth it if you like to change the design often. Proper treatment of the walls before painting will make the coating more durable, and there will be much more scope for creativity than with tiles or any other covering.