Main requirements
The first thing to take care of is the legality of the structure. After all, according to Article 222 of the Civil Code, a building is considered to be unauthorized if the necessary documents have not been issued for it. And the documents can be issued only if you comply with construction standards, which mainly consist of the distance from the fence, road, neighboring buildings:
- the distance from the neighbors’ house should be 6 meters for brick and concrete buildings, 15 meters for buildings made of wood or SIP panels;
- the construction of residential premises on the site is planned at least 3 meters from the fence, a corral for cattle – 5 meters, a garage or barn can be moved up to 100 cm to the fence;
- it is advisable to build an extension 5 or more meters from the road.
Important! Violation of construction recommendations entails administrative liability: a fine of up to 2,000 rubles.
Registration of an extension to the house is the first stage, without which it is not recommended to begin construction work. To legalize the project, you must:
- Fill out documents indicating the characteristics of the existing house and future changes (it is advisable to attach a plan).
- Submit a notification to the administration of your district.
- Wait for an inspection for compliance with fire, construction and sanitary safety requirements.
- Receive a response notification.
Legal conditions that allow you to obtain permission for an extension to the house:
- availability of construction rights (documents for the site);
- compliance with all necessary regulations;
- safety of the erected structure for other persons (primarily neighbors).
Advice! To make sure that the calculations are correct and that it is possible to build an extension, we recommend that you consult a specialist.
What materials can it be made of?
When planning an open or closed extension, it is recommended that you first pay attention to the material it will be made of.
Timber/log
Wood is an environmentally friendly, time-tested material that fits perfectly into rustic, classic and even modern styles. Other advantages of wood:
- Budget-friendly. It cannot be said that any timber is cheap, but in the variety of choices, everyone can find a material to suit their wallet.
- Versatility. A wooden extension can be built to both a brick and a wooden house.
- Aesthetics. Wood itself looks impressive: both as a finish for an open veranda and as a full-fledged wall of a warm room.
- Variability. The timber can be easily painted or coated with a colored composition, fitting it into the landscape design.
- Relatively light weight. A log extension can be installed on a pile foundation.
The downside is precisely in the natural origin of the material:
- Natural wood requires treatment with special protective compounds against fire, water, fungus, and insects.
- Due to the ease of ignition, wooden or partially wooden buildings must be removed from neighboring ones by 15 meters for fire safety purposes.
- It is possible to add a closed-type room in a season only using dried timber. Logs of natural moisture content should shrink.

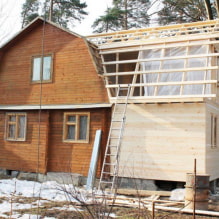
The photo shows the completion of a house using timber
Foam blocks
A permanent extension is built from 2 types of materials: brick or foam block. The first is more expensive and heavier, which means it requires more money and effort. The second is cheaper, lighter, and is not inferior to brick in strength: due to the listed characteristics, most owners of private houses and summer cottages often choose foam blocks.
Advantages of block construction:
- Versatility. Like timber, it is suitable for any house – wooden or brick.
- Thermal insulation. Due to the porous structure, the blocks retain heat better: the extension is suitable as a living room.
- Relative cheapness. In comparison with the same brick.
- High speed. The large size of the elements allows you to assemble the extension in the shortest possible time.
The disadvantages of foam blocks include:
- Low aesthetic properties. The “bare” structure looks ugly, additional costs are required for exterior finishing.
- The need for a strong strip foundation. Not as powerful as for brick, but more reliable, in comparison with frame extensions.
- Limited use. It is logical to build only capital structures from foam blocks – an additional bedroom, a living room, a summer kitchen. They are not used for an open terrace or porch.

SIP panels
The frame method may not have the same margin of safety as timber or brick, but it is much more cost-effective and faster. An extension based on a frame can be erected in a matter of weeks.
Advantages of SIP panels:
- High energy efficiency. Sandwich panels are no worse than foam blocks or bricks for the construction of capital structures: they retain heat perfectly.
- Lightness. The structure together with the finishing weighs relatively little, therefore it does not require a serious foundation.
- Speed. If a full-fledged house is assembled in a couple of weeks, then 7-10 days will be enough for an extension. By the way, you can work not only in the summer, but also in the winter.
- Cheapness. In addition to the fact that the SIP panels themselves are inexpensive, they also do not require significant costs in the form of insulation, reduce the cost of insulation, etc.
The only disadvantage is the need for protection from fire, rodents, water. In addition, they do not have the most aesthetic appearance and require external cladding with siding or other material.

Extension options
Extensions to the house can be different – from a small porch to a full-fledged warm room in which you can equip a living room or even a guest bedroom.
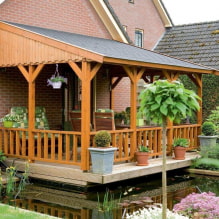
Porch
This engineering addition is erected from the front of the house, framing the entrance group. The porch can be small, including only steps, a small area under a canopy and railings. Or spacious, combining the entrance area with a recreation area. In addition to the steps themselves, you can place upholstered furniture or a dining group on it.

The photo shows a small porch near the door
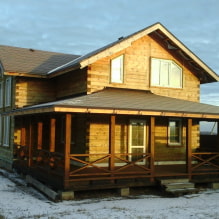
Veranda
The veranda can be located at the front – the very case of a large porch with additional zones. Or it can be located on one side, acting as an external dining room adjacent to the kitchen or living room. In addition, the veranda can completely go around the perimeter of the house.
Verandas can be open and closed. The latter can serve as a summer kitchen or guest bedroom for the warm season. And if you insulate them, you can use the space all year round.

Garage
A car extension to the house will cost less than a separate garage, so many people choose this option. The main thing is to consider the ventilation system equipment so that exhaust gases and other unpleasant odors do not penetrate into the house.

Utility room
A special place for storing household items, such as garden tools, seasonal accessories, etc. will also cost less if it is adjacent to the wall of the house. The utility block can be a spacious barn or a small outdoor “closet”.

Living room
Most often, an extension to a house is built due to a lack of square meters and must fulfill certain tasks. For example, you can fit a living room or bedroom in it, or move the kitchen out — but in this case, you will have to connect utilities to the extension.

How to make an extension with your own hands?
The technology for building an extension depends on many factors: a wooden or brick house, a block or frame structure, and so on. The easiest way to build a frame house yourself is to follow the instructions.
Step-by-step instructions
Considering the most problematic stages of construction, we will conditionally divide the process into 5 steps.
Foundation
The choice of foundation depends on the geographical conditions, capabilities, and skills of the builders. Most often, columnar, pile or strip foundations with reinforcement are chosen for frame extensions. For complex reliefs, the first 2 methods are best suited, for flat soil – option 1 or 3.

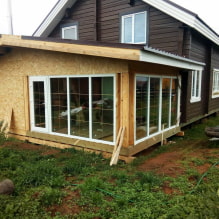
The photo shows pouring a strip foundation
Floor
When the foundation is ready, the frame is erected. For this, metal guides or wooden beams are used. First, fasten the vertical posts at intervals of 60 cm. The distance between the floor joists in the lower trim is the same – 0.6 meters.
The subfloor is also made of wood: 2-centimeter boards are laid on the joists (timber, 50 mm wide). Later, you can lay the floor covering on them or leave them as is (for example, on an open terrace or porch).
Advice! If the extension is based on SIP panels, the floor is also assembled from them without additional materials.

Walls
Wall cladding begins with the constructed frame – when the vertical and side posts, as well as the upper and lower trim are assembled, you can begin to assemble the “pie”. You can lay the insulation yourself, do the vapor and waterproofing, screw on the OSB boards or use ready-made SIP panels.

Roof
If the finished roof of a block or wooden house can be “extended” – do it. If not – choose the same roof and put it on top of the frame separately.
The roof of the extension can be:
- Single-pitched. The upper point is installed near the wall of the house, the lower one is lowered by 15-30 degrees relative to the upper one. The slope must be there so that snow does not create additional load in winter.
- Gable. Due to the need to install a ridge, it is more difficult to build than a single-pitched roof. But if you plan to create a spectacular extension, choose two symmetrical slopes.
Any suitable option will do as a roofing material: metal tiles, slate, ondulin, soft tiles, etc.
Finishing
Extensions with walls and a roof need finishing inside and outside. For exterior finishing, choose lightweight materials – acrylic or vinyl siding, wood. The interior design depends on the purpose of the room. for example, a garage or a barn made of sip panels can be left as is, and the room needs to be covered with plasterboard, painted or wallpapered, and the ceiling and floor need to be equipped.

Video for beginners
Watch all the stages of building a wooden extension on a pile foundation in the video:
Beautiful ideas for inspiration
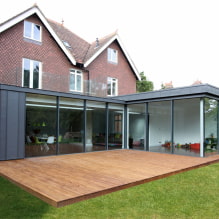
When planning to add an extension and thinking through its design, pay attention to the modern style: straight clear lines, a combination of glass, wood and metal, large windows. Such an extension will look futuristic and will set the right mood for the entire site.

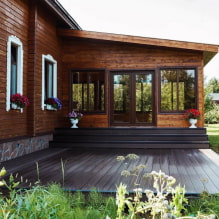
The photo shows an extension in a modern style
Using glass is generally a great idea. Look at the photos of extensions to the house made of glass: they look impressive, perfectly link the interior with the landscape design. The only downside is that glass structures are quite cold and can only be used during the warm season (from April-May to September-October).


When designing an extension, you can give up the roof in favor of… a terrace! By creating an open second floor, you will increase the usable area of the building being erected and will be able to make the space more functional.

The photo shows an extension with a roof terrace
The last piece of advice regarding extensions: take the time and effort to calculate everything. A clearly drawn up plan will save you from unnecessary expenses, unforeseen problems and will speed up the construction process.
Now reading:
- Interiors of a 54 m² apartment: layout ideas and design photos
- Discover the Ford Tourneo Courier: Your Perfect Ride!
- 10 Styrofoam Decorating Ideas for a Luxurious Interior in Your Home
- inexpensive products from Fix Price for decor that look stylish and expensive.
- The Fiat Doblò: Versatile and Spacious Family Van