Pros and Cons
Surprisingly, simple plasterboard partitions are considered an integral part of almost any renovation today. The structure, consisting of a steel frame with plasterboard sewn to it, does not stand out from the entourage of almost any design project.
Of course, the wall module needs finishing after installation, but applying decorative plaster or paint and varnish material to a smooth surface is not difficult. Among the obvious advantages of classic modern plasterboard structures:
- Low cost and cleanliness during construction. Cheap, universal and fire-resistant material is ideal for zoning.
- Smoothness of the surface erected on vertical posts. Guarantee of the absence of problems at the finishing stage. Plasterboard can be plastered, painted, tiled or wallpapered.
- Elementary installation process. Even a person who has never encountered such work will be able to cope with the work of installing plasterboard partitions.
- Possibility of hidden wiring near the door. Simplification of the design process and placement of low-current systems – no need to cut grooves in monolithic walls.
However, plasterboard sheets for installation also have disadvantages. We are talking about low moisture resistance, mechanical fragility and poor sound insulation. In all other respects, the material is really good.

Tools and materials
Anyone can assemble a metal partition frame, lay mineral wool inside, and cover the system with plasterboard. Moreover, you can handle such work without specialized tools.
The kit of a novice craftsman who wants to install a partition on his own looks quite modest. It includes a riveter, a hacksaw or metal scissors, an impact drill, a screwdriver for dowels, and a knife with blades. For horizontal marking of the frame, you will need a tape measure, a ruler, a bubble level and a visible but not too corrosive marker.
With materials, things are a little more complicated. However, the entire range is sold in any more or less large store:
- Sheets of plasterboard for installation and fastening – purchased after preliminary calculation in the required quantity. Do not forget that the partition is sheathed on both sides.
- Metal profiles – rack, guide and closing. The choice should be made in favor of the most reliable and highest quality products that can withstand significant loads.
- Sound and heat insulation – mineral wool and foam. If desired, you can give preference to other, more expensive materials made from modern polymers.
- Fasteners and hardware for fastening – self-tapping screws, dowels, dowel-nails and anchor bolts. The presented parts will allow you to fix the frame and wooden blocks on the wall, as well as connect the elements of the structure.
Other fastening tools and materials will not be needed, because the installation of partitions from profiles and plasterboard is an elementary process that can be carried out without professional equipment.

Fastening and installation of different types of profiles
The frame is the basis and main element of any sheathing and partition made of plasterboard. Almost all the operational qualities of the module depend on its characteristics. To erect the corresponding block, the master will have to use the most durable, stable and long-lasting profiles.
The thickness of the partition made of metal varies from 0.55 to 5 mm. The wider the strip, the more weight it can withstand, and the greater the load it exerts on the ceiling will be.
To arrange a partition from plasterboard, you need to use several types of profiles:
- guide profiles;
- rack profiles;
- profiles in the form of jumpers.
The design calculation is carried out in advance, long before going to the store. A person who wants to cope with the work on his own will have to make several calculations, dealing with the question of how much material should be purchased. However, all mathematical operations can be implemented using a special web application that resembles an ordinary calculator.
Guides
A guide profile for cladding is a long and fairly thick metal U-shaped strip, without seams and joints. The corresponding products are manufactured according to the standards specified in GOST, in accordance with the established dimensional grid – 50 x 40, 65 x 40, 75 x 45 and 100 x 40 mm.
The first digit of the abbreviation indicates the width of the back of the beam, and the second – the width of the shelf. The length of all the “sticks” is from 3 to 5 m, but employees of construction stores can cut them according to the customer’s individual parameters.
Each guide profile has special holes with a diameter of 5 mm. The marked holes are perfect for ordinary mounting dowels and dowel-nails for fastening the partition. With their help, the craftsman constructs the basic frame — the main element of the future structure. Almost all operational characteristics of the installed interior partition made of plasterboard depend on its quality.

Rack
Rack profiles are beams made of fairly durable metal and have a classic C-shape. Such racks for cladding are inserted inside the guide elements, forming a frame — a base for the plasterboard partition being erected in the room.
The sizes of rack profiles without seams and joints are also prescribed in the standards and regulations of GOST: 50 x 50, 65 x 50, 75 x 50 and 100 x 50 mm. The length of the strips varies between three and four meters. The configuration of the slats should be chosen very carefully, having understood the dimensions of the purchased gypsum boards and the fact of the presence of complex architectural forms.
When buying rack profiles, you can and should pay attention not only to their physical strength, but also to the length indicator. If the materials used are short beams compared to the walls, the master will receive a fragile structure that is not very reliable in terms of placement on the racks. An insufficiently massive module will not be able to hold the interior partition at the desired angle, resulting in a significant distortion, noticeable after finishing the seams and joints.

Horizontal lintels and racks
Often, plasterboard partitions in rooms are equipped with cut-out parts for further installation of arches or a full-size doorway. At the cut-out points, the structure must be reinforced using special profiles in the form of lintels. Such products are easily made independently (from guides and vertical racks) or purchased in hardware stores.
It is quite easy to connect certain sections of a single metal plasterboard frame and sheathing – this does not require welding or similar complex methods. The thing is that the lintels and posts usually have special 5 mm V-shaped notches (or 45° angles). The parts are inserted into each other until the fastening stops, after which they are fixed with additional screws.
Thus, the structure turns out to be as strong and reliable as possible. Moreover, even a large plasma TV can be hung on a plasterboard partition in a room – of course, if there are no doubts about the correctness of the installation scheme or the skills of the master responsible for the installation.
Choosing plasterboard sheathing
Drywall is a modern building material with a huge number of operational advantages. Due to its optimal weight, elementary installation process and sufficient strength, it has gained incredible distribution and popularity. With its help, people sheathe the walls of rooms, refine ceilings, create apartment architectural openings and erect reliable, truly laconic partitions.
Sheets, racks and boxes made of plasterboard consist of a standard gypsum core protected by external reinforcing layers of dense construction cardboard. Depending on the key characteristics, all panels of this type are divided into several large groups:
- GKL is a standard gypsum board for cladding, without seams and joints with a fire safety class of KM2, used under normal conditions;
- GKLV is a moisture-resistant gypsum board, mounted on profiles in rooms with a high degree of air humidity;
- GKLO is a fire-resistant gypsum board, distinguished by incredible parameters in terms of fire safety;
- GKLVO is a gypsum board for cladding, characterized by an excellent degree of protection from both fire and moisture.
There are other ways of dividing gypsum board into different groups. This building material can be classified according to different principles — edge type, partition thickness, area of primary application, etc. Many well-known companies — Knauf, Volma, Gipsopolimer, Gyproc and GIFAS — are engaged in the production of such products.

Marking and preparation for partition installation
Installing a horizontal gypsum board partition with subsequent cable routing is a simple operation, within which, however, there is room for certain interesting nuances. You should start working with the racks only after competent and comprehensive preparation, which mainly consists of carrying out various calculations. First, the craftsman must figure out the quantity and volume of materials to be used.

The next stage of preparation is planning the plasterboard structure itself and its cladding. Simply put, the apartment owner will need to create a small semi-professional engineering project for the partition:
- We determine the future location of the horizontal partition made of metal profiles of adequate strength and plasterboard. We take measurements from all key points of the opening, and also think over the methods of placing the slats for future marking of the frame.
- We determine the position of the seams and joints of the arched frame or doorway (if it needs to be made at all). Here you will have to take into account a lot of details: the configuration, layout and interior of the room.
- Prepare the drawings. The presence of such papers (or their digital analogues) greatly simplifies the process of installation with screws. To create sketches, you can use some lightweight engineering software.
The last stage is independent marking of the distance and width of those plasterboard sheets and profiles that will run along the walls and floor coverings. You need to start marking from the ceiling, since all the points placed “from above” can be easily transferred to the floor along plumb lines, wooden blocks or a laser level.
Step-by-step instructions for erecting a partition (with an opening for a door and door frame)
As soon as the stages associated with preliminary calculations and marking are completed, you can proceed to the direct installation process. To begin with, the master will have to build a frame, constructing it from previously purchased metal profiles. Then the structure is covered with plasterboard and soundproofing is installed. All work is carried out step by step according to a fairly strict and detailed step-by-step instruction:
1. We fix the guide profile for the partition (box) on the floor surface, adjusting it along the intended lines of location and width. If the project includes a doorway, do not forget to leave a horizontal space of the appropriate length.
2. We fix the metal profile with our own hands using dowel nails and a screwdriver. When the part for the plasterboard sheet is in its designed place, you need to once again make sure that its distance is correct.


3. The next step is to fix the door guides to the vertical ceilings (walls) along the entire distance. When performing this work, the craftsman should use a plumb line, laser level or bubble level. A plumb line from the floor to the ceiling will also work.
4. Next, the guide profile is attached to the ceiling, in compliance with all the previously specified regulations. Fixation is carried out using 600 mm dowel nails, placed in increments of 20-25 cm. The parts are connected to each other using a special tool – a riveter.


5. The next step is to mark the location, width and distance of the opening of the future door and door frame on the wall. The corresponding lines need to be drawn both on the upper and lower parts of the frame structure space. If necessary, use a plumb line or laser level.
6. Next, the direct cutting of those vertical parts that will form the space for the door or arched opening in the partition is carried out. After finishing work with the grinder, the elements are again fixed in place with screws with the required strength.


7. Those frame plasterboard sheets and modules that will be located in width next to the doorway require additional reinforcement. It can be implemented using the same bars, fixed with 600 mm screws. If desired, the craftsmen use metal bars in the form of jumpers, not forgetting about the holes for laying cables.
8. The last stage is the installation of vertical ceilings, also mounted with screws along the plumb line. The racks for the partition should be located at intervals of 35-60 cm, depending on the design loads of the structure. The specialist first cuts all the profiles according to the pre-calculated dimensions, and then attaches them to the floor and ceiling space. All elements are connected with long screws.


In apartments with high ceilings (from 2.5 to 5 m), the structure made of plasterboard sheets will have to be reinforced with additional crossbars after fastening. In this way, we improve the stability of the frame on which the plasterboard sheets will subsequently be held.
After the main metal supporting system is installed, you can start working on fastening the gypsum boards and gypsum plasterboard soundproofing boards. The panels are cut using a special tool or an ordinary construction knife with replaceable blades. You can get acquainted with the features of this process thanks to the detailed video instructions.
What do you need to know about soundproofing gypsum boards and nearby walls?
People choosing a material for filling a frame made of metal profiles need to pay attention to noise insulation and soundproofing boards with a density that will vary between 40 and 70 kg/m³.
These can be either advanced soundproofing panels like Tecsound or ordinary environmentally friendly mineral wool, which acts as insulation. The cost of gypsum boards varies, so you can choose a solution for your budget.
The installation of a noise-absorbing layer and sound insulation on a wall made of plasterboard sheets is carried out step by step according to simple, but quite strict instructions:
- Cut vertical strips of fibrous material with a knife to match the dimensions of the erected metal structure. You need to work very carefully, using levels, gloves and respiratory masks.
- Filling the openings between the plasterboard sheets and profiles with the selected material. The filler in the form of cotton wool should fit as tightly as possible, leaving no unnecessary cavities or voids after installation.
- Laying additional insulation. If the same Tecsound boards were used as the base material, then mineral wool comes second. It is also cut with a knife to match the cell sizes of the metal structure frame.

It is important to ensure that the fiberboard is extremely tightly laid – level, without gaps or unnecessary deformations along the length.
How to prepare a partition for further finishing?
Preparing a structure consisting of a frame on metal profiles and layers of building plasterboard for future finishing is a job that deserves special attention. In general, all operations look like this:
- Gluing the vertical reinforcing mesh to the joints of the gypsum board. Applying putty to the corresponding connecting points. The layer thickness is made minimal (from 3 to 10 mm).
- Accurate and maximally detailed processing of the screw fixing points with ordinary putty (along the entire length).
- Applying a primer. The primer will protect the partition from climatic influences and decay. In addition, the substance will increase the adhesion parameters.
- Laying the finishing putty – creating a smooth and neat surface, completely ready for further finishing.
The resulting structure can be refined in different ways – with simple wallpaper, decorative plaster, ceramic tiles, putty or paint and varnish material. Here everything depends on the personal preferences of the apartment owner.

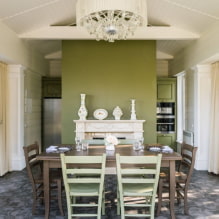
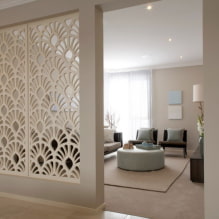
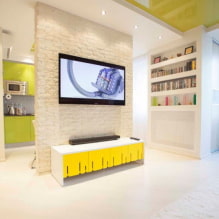
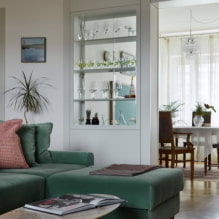
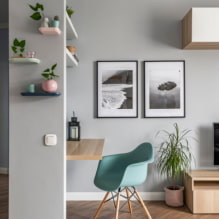
Beautiful examples for inspiration
Below we have made a selection of stylish and unusual partitions that you can repeat yourself. Enjoy the variety and versatility of plasterboard structures.