Pros and cons
Self-leveling floors have a number of features. When pouring such a floor in the bathroom, you get an excellent result with many advantages:
- No joints. The joints of the tiles, which are most often chosen for finishing, create a real problem: if you do not notice the depressurization of the seams in time, water will get under the tile and it will start to “gurgle”. No joints – no problem.
- Waterproof. Self-leveling floors do not allow moisture and water to pass through – the only weak points are considered to be the junctions with the wall, which in the bathroom are enough to cover with waterproofing to achieve 100% protection against flooding of neighbors below.
- High strength. The surface is resistant to abrasion, mechanical impact. Self-leveling floors are often used in commercial premises, so in an ordinary apartment they will definitely last for decades.
- Easy to care for. Again, due to the absence of joints and a smooth surface, wet cleaning is a pleasure. The use of aggressive chemicals is also not prohibited.
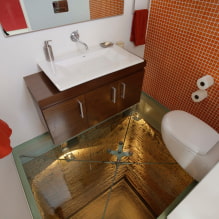
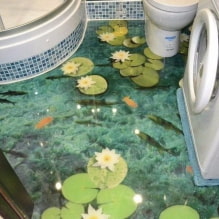
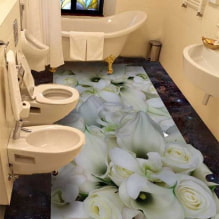
- A large selection of colors and designs. From single-color coatings to three-dimensional images of nature and animals.

Disadvantages of self-leveling floors in the bathroom:
- High cost. Buying the mixture itself and paying for the work of professionals will cost a pretty penny. You can try to install the self-leveling floor in the bathroom yourself, but you will have to be responsible for the quality of execution and the beauty of the decorative coating yourself.
- High requirements for the base. Self-leveling floor is a decorative finishing coating, several millimeters thick. In order for it to be smooth, there must be a high-quality smooth screed underneath.
- Difficulty of removal. During the next renovation, dismantling the floor in the bathroom will be difficult and expensive.

Which type is better to choose?
Initially, solutions are divided into cement and polymer: the former are considered rough (screed), the latter are decorative.

The photo shows a single-color glossy coating in bathroom
Polymer self-leveling floors in the bathroom, in turn, are divided into subspecies:
Epoxy
Transparent resin has self-leveling properties, looks aesthetically pleasing, allows you to create 3D floors with various three-dimensional patterns.
The disadvantages include fragility – due to the characteristics of the material, it can crack upon impact and the coating will be hopelessly damaged. In addition, the surface is easily scratched and after a few weeks of use can turn from glossy to matte.

Polyurethane
A more durable and reliable version of the self-leveling floor, provided that a highly filled filler is used (layer up to 2 cm). But the choice of design is much smaller than in the first case: mainly the surfaces are made in one color.
Manufacturers recommend polyurethane for use in rooms with high loads. Even if cracks form under it, the floor will retain its original appearance, due to its elasticity and ability to stretch.
Important! The liquid composition dries for a long time, so even a beginner can handle the installation.

Methyl acrylate
Unlike the first two varieties, this self-leveling floor dries extremely quickly: maximum strength is achieved within two hours after pouring. Based on this feature, installation should be entrusted to professionals: there is no room for error in working with methyl acrylate.
Otherwise, the characteristics are the same as polyurethane – the floor will be strong, reliable, and durable.
Important! During pouring and until completely dry, the composition emits a pungent odor, so forced ventilation is required for comfortable work.

The photo shows the finished methyl acrylate surface
How is the installation done?
Installation of the self-leveling floor in the bathroom occurs in 5 stages:
- Dismantling the old coating.
- Waterproofing.
- Laying the “warm floor” system (can be skipped).
- Screed according to level.
- Pouring the decorative layer.
More about preparation and pouring technology we will talk further.
Tools and materials
To install the self-leveling floor you will need:
- a drill or a hammer drill with a mixer attachment;
- a bucket or other container for mixing ingredients;
- a float level or rule;
- a needle roller;
- a spatula.
The amount of mixture for pouring is purchased based on the size of the bathroom and the layer thickness in mm – usually the consumption is indicated on the packaging. Do not forget to add ~10% of the reserve to the required volume.
Step-by-step instructions
Let’s get to work: first of all – dismantling. Old tiles or crumbling screed must be removed, it is advisable to get to the concrete base.
The next mandatory step is waterproofing. Spread the mastic or water dispersion with a brush or roller over the entire surface, going up to a height of 7-10 cm onto the walls. To save money, only insulate the joint with the walls along the perimeter, applying the mixture 10 cm on each side.

When the waterproofing composition has dried, we proceed to installing the heated floor. It should be laid according to the instructions. You can skip this step if the apartment is warm and the self-leveling floor in the bathroom does not require additional heat.

The most difficult stage is the screed. It must be done well so that the surface is even, smooth, and suitable for further pouring. If you doubt your abilities, it is better to entrust this work to professional craftsmen.

Pouring the decorative composition is started only after the cement has completely dried. To check, stick the film and leave for a few hours: if no condensation has formed from the inside, the base is completely dry.
Then sand the surface, clean it from dust, prime it (the latter will reduce the consumption of the self-leveling mixture).
Important! Before finishing work, set the room temperature to 15-25C, check that the air humidity does not exceed 80%.
The most interesting stage begins: decorative. Pour the required amount of dry mixture into water, stir with a dry mixer until smooth.
Fill in strips: start from the far corner, gradually moving towards the exit. After applying the strip, the layer thickness is leveled with a spatula or a rule. A pass with a needle roller will help remove air bubbles.
When the entire surface is filled, go over the floor again with a needle roller and leave until completely dry (see the instructions for the exact time).

Important! As with wallpapering, windows and doors should be closed – do not allow drafts until the wallpaper has completely hardened.
Video
To better understand the technology, watch a detailed video:
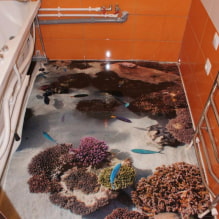
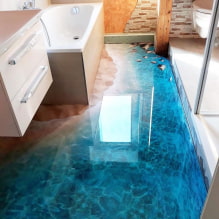
Design options in the bathroom interior
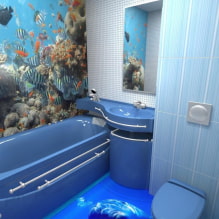
Many owners of apartments and houses do not even consider a poured solution for their bathrooms. Some imagine that it will look like in a store or warehouse, others are scared by pictures of the sea depths in the bathroom design.
However, the technology gives many more design options: having abandoned flowers and dolphins, you can find that there are beautiful geometric or abstract patterns. Or completely abandon the patterns, making the coating monochromatic and colored.


The photo shows an example of black self-leveling floor in the bathroom
Weigh up all the pros and cons, calculate the cost per square meter of material and work – only then make a final choice in favor of one or another floor covering.
Now reading:
- 10 beautiful evergreen plants for your garden: enjoy them all year round!
- 20 easy-to-care indoor plants: names and photos.
- items for an apartment from Svetofor that you should avoid buying
- How to effectively wash dishes? – key tips and tricks for all types.
- Apartment design 36 sq. m: more than 60 photos, layout options for studios and 1-2 rooms.