Features of pasting paper wallpaper
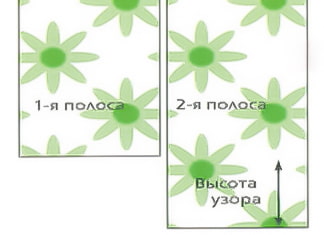
You need to study the marking and prepare the strips according to it. Arrows on both sides of the vertical line at the same level (straight marking) indicate that the pattern must be composed. At different levels – glue in reverse order, when each subsequent strip is directed in the opposite direction. An arrow on one side indicates that there is no need to adjust the pattern.
The list of other basic rules for pasting walls contains the following theses:
- All remnants of the previous coating are removed from the panels with a spatula, after which the surface is moistened, which is necessary for better adhesion.
- The glue is diluted according to the instructions or purchased ready-made.
- First, start spreading the strip, and then the wall panel. The edges of the strip must be processed.
- Start applying from above. In this case, the wallpaper is folded. You need to glue the paper strips from the corner, setting them vertically with a plumb line or level.
- Smooth the canvas with a rubber roller or dry cloth. To expel air and excess glue, do this from the center to the edges.
The paper will shrink as it dries. To avoid gaps, glue the strips with an overlap of 0.5 cm. Subsequently, when the paper dries, the wallpaper will shrink.
You need to apply the glue first to the paper, so that the paper wallpaper has time to soak in while it is being spread on the wall. If you buy ready-made wallpaper glue, before gluing the paper wallpaper, mix it thoroughly, achieving a uniform consistency. The main thing is to choose the right composition to ensure reliable bonding.

Which wallpaper glue is suitable for paper wallpaper?
The right choice of glue guarantees that after drying there will be no yellow spots, the paper wallpaper will not fall off, but when the time comes to change it, it will easily come off the wall. You need to choose based on the type of paper wallpaper, depending on whether it is simplex or duplex:
- Simplex. For thin single-layer paper wallpaper, compositions made from cellulose or cotton processing products are used. Universal ones are also suitable.
- Duplex is a two-layer paper. Wallpaper is used for painting. It is heavy and thick, which requires the use of non-woven glue or CMC.
You can glue it with a composition for vinyl wallpaper. By adding PVA to it, you achieve greater adhesion strength. Bustilate or pure PVA is also used. All information about the mixing technology is on the packaging. If it is a special glue for paper wallpaper, this should be indicated.

What tools will you need?
To prepare in advance, you need to purchase and prepare:
- a container for mixing the adhesive mass;
- a wide rubber roller;
- a narrow roller and dry rags;
- a spatula for mixing glue;
- a wallpaper knife and scissors;
- a level or plumb line;
- a pencil or ballpoint pen;
- a brush with a wide back.
Once everything is at hand, proceed to preparation.

Proper preparation for gluing
Once the glue is prepared, everything needs to be ready. Otherwise, it will have to be thrown away, as it will set and become unusable.
The preparatory process is as follows:
- To avoid staining the floor covering, it is covered with polyethylene film. It is important that it is clean.
- The electricity is turned off.
- The covers of the sockets and light switches are dismantled.
- The adhesive composition is prepared.
- If there is not enough light, the socket connectors are sealed with tape, which is then removed.


How to dilute glue correctly?
Before gluing paper wallpaper, you need to cut it into strips and prepare the glue. The technology is that the dry mixture is poured from the unpacked pack into a dry, clean, deep container. Water is also added there. In this case, you need to constantly stir until a thick, sticky mass is formed. The proportions are indicated on the package. Ready mixtures just need to be stirred.
IMPORTANT! Prepare enough glue for 4-5 strips. Otherwise, the remainder will thicken. Do not add water to make it liquid again. This mixture will not hold the wallpaper on the wall.

Preparing the surface

It needs to be cleaned of the remains of the old coating. You can’t glue paper wallpaper on whitewash and paint (oil or water-based). The surface must be cleaned of dust. Old wallpaper is torn off, the remains of glue are cleaned off.
You can glue it to a surface:
- pasted with newspapers;
- coated with putty;
- impregnated with primer.
You can glue paper wallpaper without preparation on concrete or plasterboard. But polystyrene foam will not withstand the load. This material is not durable enough.

DIY wall pasting instructions
You can glue double-layer paper wallpaper end to end if this method is provided by the manufacturer. The pattern is adjusted dry on the floor. The technology assumes that the stripes are smeared first, and then the wall. The step-by-step instructions consist of four stages.
Stage 1: diagram and marking of walls
To ensure that the first strip is oriented vertically, a line is drawn on the surface of the wall panel. Its location is determined using a plumb line, laser level or level. The wall can be marked out completely, which will allow you to determine the required number of wallpaper strips.


Stage 2: wallpaper preparation
After measuring the ceiling height, proceed to preparing the paper sheets.
- The pattern is adjusted on the floor. The offset in millimeters is indicated on the packaging. If the measurements are taken correctly, the wall covering will be seamless.

- Apply the glue to the paper wallpaper with a wide brush, evenly distributing the mixture over the surface, capturing the edges.

Stage 3: gluing
- Fold the coated wallpaper so that about a third of its length remains exposed.


- When applying the canvas from above near the ceiling, make sure that after pressing it is vertical. For this purpose, special markings are applied.

- After gluing the top, separate the folded part and press the strip to the very bottom.

- Air and excess glue are driven out from the axis to the edges with a dry cloth.
Stage 4: final
- All protruding parts are cut off. There is no need to peel off the strip; trimming is done with a special wallpaper knife.

- The joints are rolled with a special narrow roller.
- The protruding glue is wiped off with a dry, clean cloth.
How to glue in problem areas?
In the process, you will have to glue paper wallpaper in hard-to-reach places. Each case is different and has a number of features. To glue areas under a window, above a doorway, behind batteries, you need to measure and prepare strips of the right size in advance. Difficulties also arise if the walls in the room are uneven, as well as when pasting internal and external corners.
The photo shows a diagram of pasting wallpaper around sockets and switches:

The photo shows a diagram of pasting wallpaper behind a radiator:

Step-by-step guide to pasting the ceiling
Basically, the technology is identical. Perhaps, it is better to paste paper wallpaper on the ceiling from the window. It matters how the stripes are pasted (overlapping or end to end). Otherwise, the sequence of actions is the same.


Video instructions
For greater clarity, it is better to watch the video, which describes and shows the full cycle of work.
How long does paper wallpaper dry?
On average, it is 8-20 hours. Single-layer ones dry faster. During this time, there should be no drafts in the room. The drying time depends on the air temperature. In unheated rooms, this period can be doubled. It is prohibited to speed up the process with fans, heaters, hair dryers.

To ensure that paper wallpaper lasts a long time and is strong, it is better to give it some time. If you follow the rules and recommendations presented, the renovation will please the eye for many years.
Now reading:
- Steampunk in the interior: 39 inspiring photos and a complete design guide.
- examples of how to organically combine Soviet furniture with a modern interior.
- Sofa for the balcony: 50 modern photos and ideas for a stylish loggia.
- Sliding doors in the interior: more than 70 photos and fresh decor ideas
- 10 stylish bedrooms with simple and elegant design.