Rules for self-pasting non-woven wallpaper
The pasting technique involves the use of generally accepted norms and rules. In addition, it is necessary to take into account the characteristics of non-woven finishing materials. They are wider than paper ones and have a greater weight. All you need to know so that the non-woven does not swell and the pattern is preserved is:
- Before pasting, the wall must be puttied (if the panels are uneven) and primed.
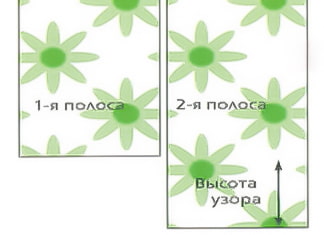
- The direction of the pattern is indicated on the packaging using special symbols.
- The pattern is adjusted along the edges in accordance with the instructions (straight – all stripes are glued in one direction; reversible – in the opposite direction).
- The non-woven fragments are pressed against the wall from top to bottom, smoothed with a dry cloth, the joints are rolled with a special rubber roller.
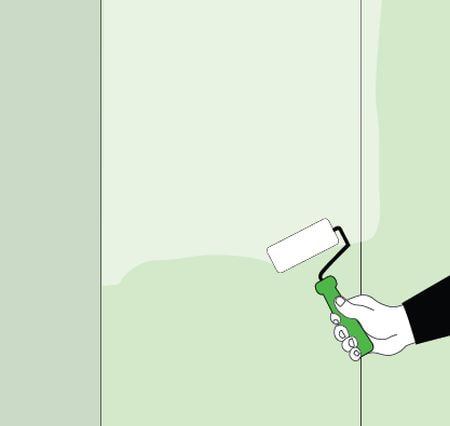
- The glue must be spread on the wall. Non-woven fabric eliminates the need to apply it to the back of the base.
- The technology involves gluing strips seamlessly (butt to butt, without overlap).
The temperature in the building during drying should be constant. The large weight of non-woven finishing materials requires that the glue have the appropriate thickness and viscosity. The wallpaper does not wrinkle if the surface is smoothed out with rollers or clean rags after gluing.
Which wallpaper glue is best for non-woven wallpaper?
Paper is used as the base of the wallpaper during production, which allows the use of starch-containing compounds. You can glue it with PVA glue or specialized mixtures. If they contain polymer components, then such wallpaper can be glued to plasterboard or cork without puttying. Mixtures are now sold that include antibacterial additives that prevent mold and mildew from appearing.
This problem is solved with a primer. Before gluing, you need to consider the thickness, size and weight of the strips. If we are talking about massive non-woven wallpaper, then a thick (viscous) solution is used when gluing. Light ones can be glued with a liquid one. If the wall surface has unfilled cavities, glue with increased density is used. The recipe for preparation is indicated in the instructions for use.

What tools will you need?
You should prepare in advance. You will need inventory and tools. Before you start working with non-woven materials, you need to think about what glue to use and what you will need for this. The process cannot be completed successfully without:
- wide brushes or rollers for applying the adhesive;
- wallpaper knives and a wide spatula for cutting the ends of the strips;
- special equipment (electronic levels, plumb lines or levels);
- a container for preparing the adhesive;
- a clean dry rag for smoothing the surface of the wallpaper;
- office scissors;
- narrow rubber rollers for rolling seams (joints);
- pencils or ballpoint pens for applying markings.
All of the above must be available. The list does not include the tools needed for preparatory work.

Proper preparation for wallpapering
General requirements state that before gluing non-woven wallpaper, you must:
- Wash the floor, or better yet, lay cellophane on it. This will save time on cleaning.
- All electrical wiring outlets are insulated.
- By removing the socket covers and switches, the room is de-energized.
- If there is not enough natural light in the room, the “glasses” with socket and switch connectors are sealed with masking tape, which is then removed.
All necessary equipment must be in good working order, clean, and better yet, new.


How to dilute the glue correctly?
It is better to prepare it immediately before gluing non-woven wallpaper. Strips of the required length are cut in advance. Dry granulated mixture is poured into a dry container. Then it is filled with the required amount of water. In this case, it is necessary to continuously stir the resulting mass until the granules are completely dissolved, monitoring the consistency.
IMPORTANT! The recipe indicated on the wallpaper glue package is calculated for the entire pack, and it is not advisable to dilute the glue in advance. It thickens over time. The optimal amount is for 4-5 strips.

Surface preparation
Non-woven wallpaper can be glued to:
- concrete panels;
- plastered brick walls;
- plywood or OSB;
- drywall or other prepared surface.

Laminated chipboard surfaces are not suitable, since such a surface does not absorb glue, and there will be insufficient adhesion to non-woven elements. It is important to remove the remains of the previous coating:
- paint;
- decorative plaster;
- dry plaster;
- lime whitewash;
- old wallpaper.
The surface is cleaned of dirt, oil stains and dust, leveled (plastered) and primed. Only after this can you start gluing non-woven wallpaper.

DIY wall gluing algorithm
First, the wall is coated with glue. The width of the treated surface is greater than the width of the roll. Lubrication should be done with a special soft roller or a wide, thick brush. When preparing the strips, take into account the need to adjust the pattern. Non-woven wallpaper should be glued end to end.
Stage 1: diagram and marking of walls
The width of the roll is measured from the window, and a vertical strip is drawn using a level or plumb line. This is a guideline so that the fragments and joints are even. By marking the wall along its entire length, you can determine the required number of whole strips, which should be cut in advance.

Stage 2: preparing the wallpaper
If non-woven wallpaper is pasted without matching the pattern, the fragments are cut with a small allowance in length (5-7 cm more than the ceiling height). When it is necessary to adjust the pattern, the stock is made larger by the amount indicated on the packaging of non-woven wallpaper opposite the corresponding symbol.

Stage 3: pasting
The pasting process starts from the window. When applying the fragments, it is necessary to ensure that they are vertical. To do this, apply markings to the wall.

When gluing non-woven wallpaper, only the wall is covered with glue. If the sheets are heavy (vinyl-coated), you may need to apply glue to both the wall and the wallpaper.
Rolling with a roller or smoothing with a rag, press the middle of the strip along the entire length, having first unrolled the wallpaper.
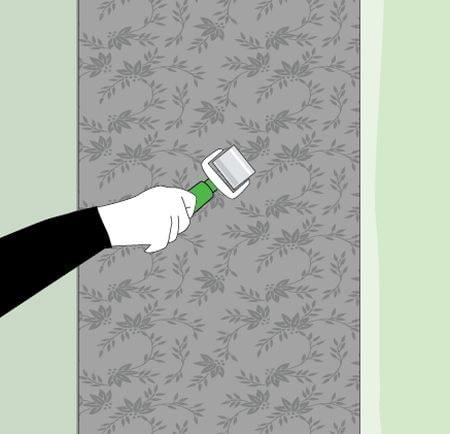
Residual air and excess glue are driven out from the axis to the edges, which are rolled with a narrow special roller for tight adhesion. There should be no overlaps.
Stage 4: final
All protruding parts of the fragment are cut off with a wallpaper knife. To ensure an even cut, a wide metal spatula is applied to the cutting line. You can leave the wallpaper as is at the bottom, since after pasting, a skirting board is installed to hide the defects.

How to glue in problem areas?
Such areas include:
- internal and external corners;
- bay windows, arches;
- areas above door and window openings;
- walls behind radiators, etc.
To glue non-woven wallpaper in these places, you need to prepare elements of suitable shape and size in advance.
The photo shows a diagram of gluing wallpaper around sockets and switches:

The photo shows a diagram of gluing wallpaper behind a radiator:

Features of pasting with meter-long wallpaper
There are several factors typical for non-woven wallpaper one meter wide:
- Glue is applied only to the wall.
- If mistakes are made, you can remove the fresh canvas and paste it again.
- It is difficult to do the work alone.
- The non-woven fabric allows you to adjust the joints by smoothing them out.
Step-by-step guide to wallpapering the ceiling
The process has a number of features. The strips are laid across the width of the room from the window to the door. The difficulty may be caused by the place of fastening of the chandelier, but it can be solved.


Video instructions
For clarity, before gluing non-woven wallpaper, it is recommended to watch the video. Where all the technological nuances of the process are described.
How long does it take for non-woven wallpaper to dry?
It all depends on the temperature in the room. The higher it is, the longer it will take to dry completely. Usually it is 6-10 hours. There should be no drafts in the room at this time.

The pasting procedure is simple and can be done independently, without the involvement of a professional construction team. Non-woven wallpaper is ready for painting, which is an undoubted plus. The only thing you need for a quality repair is accuracy and the instructions above.