Materials and tools needed for installing tiles on the ceiling
Materials:
-
 ceiling tiles,
 - glue,
- primer,
- putty.
 Tools:
- metal spatula,
- brush,
- tape measure,
- rope or strong thread,
- paint scotch tape,
- painting knife,
- roller,
- fabric napkins.
Preparing to glue ceiling tiles
Before you start installing tiles on the ceiling, prepare the surface to which you will attach them. Since each ceiling tile is very light, it does not require strong adhesion to the ceiling surface. But if there is whitewash left on it, it is better to remove its remains, otherwise the tile may fly off over time. It is also better to remove any excessively large irregularities. This is done in the following order:
- Scrape off the remains of whitewash or other coating with a metal spatula;

- Use it to apply a thin layer of putty material to the cleaned surface, let it dry;

- Using a brush, apply primer over the putty. Usually, PVA glue diluted to the required consistency is used.

Applying markings before installing ceiling tiles
There are two ways to lay tiles on the ceiling:
- parallel to the walls,

- diagonally to them.

With the first method, the edges of the tiles are directed parallel to the walls, with the second – at an angle. Which gluing method to choose depends on the size of the room, its geometry, and the type of ceiling covering. If the room is long and narrow, it is better to choose a diagonal direction of laying, this technique will visually slightly change the unsuccessful proportions.
Tip: If the room is large, diagonal tiling will look more advantageous than parallel. In large square rooms, you can use both methods.
You can also install tiles on the ceiling in different ways:
- from the chandelier (from the center of the ceiling),
- from the corner of the room.
Diagonal installation usually starts from the center, and parallel installation can be done in both ways. Both the marking and the installation of ceiling tiles in both options are slightly different.
Installing tiles on the ceiling from the center
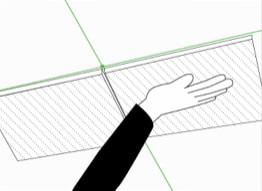
For marking in the center of the ceiling, we draw 2 perpendicular lines to each other, each of which is parallel to the wall. This can be done using threads and tape. Thus, 4 right angles are formed on the marking, which are joined at one point.

For the diagonal method of gluing ceiling tiles, the right angles must be divided in half (by 45 degrees), and marking lines must be laid along their diagonals. This is done if the room is square.

If its shape is closer to rectangular, we mark the diagonal installation of ceiling tiles as follows:
- Connect the corners of the room with diagonals;
- Through the intersection point, draw 2 lines parallel to the walls;
- Divide the resulting 4 right angles with diagonals and draw marking lines along them.
When gluing ceiling tiles, apply glue to each tile immediately before installation; there is no need to do this in advance. After applying the adhesive, press the ceiling tile firmly to the surface, hold for a few minutes, then release and begin applying adhesive to the next tile.
Procedure for gluing:
-
 When gluing tiles to the ceiling, place the corner of the first tile exactly in the center, and then follow the markings.
 - Lay the first four tiles on the ceiling in the marked squares, trying to do this as accurately as possible.
- Tiles in the corners and near the walls are cut to size using a painting knife.
- The gaps formed at the joints are filled with acrylic sealant.
Installing ceiling tiles from the corner
In this case, marking the ceiling begins from the corner of the room, which is called the “base”. Usually, this is the corner that is best visible when entering. One of the walls of this corner is also called the “base”, usually this is the longer wall (in a rectangular room).
To mark in both corners of the base wall, we step back from it by the size of the tile plus one centimeter for the gap and put marks there. We stretch a thread between the marks and secure it with tape. This creates a guide line for marking, along which we begin installation. The gluing is carried out not from the first, but from the second tile, since the first is secured with tape, which interferes with the work.

Important: When installing ceiling tiles, do not neglect the marking! There are no absolutely straight walls, in the middle of the work you may find yourself in a situation where nothing can be fixed: a wide gap forms between the tiles and the wall.
The order of work when gluing:
- Apply glue to the tile (it is enough to apply a small amount of glue to the center of the ceiling tile and its corners);
- Put the tile in place, press and hold for a few minutes;
- If during installation the glue comes out beyond the edges, remove it immediately with a soft, clean cloth;

- Glue the ceiling tiles in consecutive rows;
- Cut the tiles in the last row to size with a painting knife;
- If small gaps formed between the tiles on the ceiling during installation, seal them with sealant.

Now reading:
- Effective ways to combat midges in the kitchen at home
- How to hide pipes in the bathroom? – 6 effective methods with instructions and photos
- Floor in the hallway: 30 photos for choosing style and materials.
- Green sofa in the interior: 76 photos and ideas for the living room, kitchen and children’s room.
- Gray doors in home interior: more than 60 photos and creative design ideas.