Flower pots made from clothespins
You can make such a flowerpot from scrap materials with a minimum of effort. The finished product will fit perfectly into the Scandinavian or eco-style, as it is decorated with natural wood.


Tools and materials
To make a flowerpot you will need:
- Wooden clothespins.
- A tin can.
- Thick colored cardboard or paper.
- A plant.

Step-by-step instructions
- Distribute the clothespins along the walls of the can. For strength, they can be secured with hot or universal glue.
- As a result, you should get a flowerpot like this:
- Plant the flower inside: some plants will need a can, while others will need an additional pot.
- Decorate the craft with a heart cut out of cardboard. You can also decorate the pot with a cord or ribbon.


The photo shows another option for using the craft – using it as a candlestick.
Concrete flower pots
Stray yoghurt cups, plastic buckets and bottles can turn into excellent molds for homemade concrete pots. Such products will be an original addition to the interior in the loft or minimalist style.

The photo shows flower arrangements made of concrete, made with your own hands.
Tools and materials
For work you will need:
- Regular or low-dust concrete mix from a hardware store.
- Molds of different sizes (two for each pot).
- Bucket.
- Stirring stick.
- Thick tape and any weights.

Step-by-step instructions
Let’s start making flower pots with your own hands:
- Mix the concrete mixture in a bucket according to the instructions until it reaches the consistency of sour cream.
- If there are holes in the bottom of the mold, get rid of them using tape.
- Take a large mold and fill it with concrete mortar about halfway.
-
Fix a small mold in the middle, having previously deepened it so that the mortar fills the space between the containers. Monitor the thickness of the bottom and walls. To prevent the inner form from warping, fill it with coins or sand and secure with tape.
- When the concrete hardens (after about 3 days), remove the finished pot from the form.
- To get rid of defects, sand the surface with sandpaper. The homemade flower pot is ready!
-
The product can be decorated by adding various objects – shells and pebbles, or painted with acrylic paints.


Fix the small form in the middle, having previously deepened it so that the solution fills the space between the containers. Monitor the thickness of the bottom and walls. To prevent the internal form from warping, fill it with coins or sand and secure with tape.
Fix the small form in the middle, having previously deepened it so that the solution fills the space between the containers. Monitor the thickness of the bottom and walls. To prevent the inner mold from warping, fill it with coins or sand and secure with tape.


The photo shows an original example of decorating flower pots made with your own hands.
Figured flower pots made of cement
The incredibly fashionable geometric flower pots can be made by yourself, spending a minimum of money. To make the mold come off the concrete or plaster easily, grease it with Vaseline.
Flower pot made from tiles and a bottle
If you have a few old tiles lying around the house from renovations, you can make an unusual flowerpot for houseplants out of them.

The photo shows magnificent flowerpots made with your own hands from Moroccan tiles.
Tools and materials
You will need:
- Ceramic tiles with a pattern.
- Superglue.
- An empty plastic bottle.
- Scissors.

Step-by-step instructions
Making a flower pot will take no more than 15 minutes:
- Inspect the selected tiles: they should be without chips. Lubricate one of the edges of the product with glue.
- Glue the second tile at a right angle. Press the elements tightly against each other and hold for at least a minute.
- Repeat the same with the remaining tiles.
- As a result, you will get an even cube, open on both sides.
- Cut off the bottom of the plastic bottle so that it is slightly lower than the tile.
- Place the blank inside the ceramic cube. The bottle should fit tightly against the walls of the flowerpot. If desired, you can glue it.
- Plant houseplants in the bottle. The flower pot is ready!


The photo shows a flowerpot made of square black and white tiles with patterns.
Clay Flower Pot
Even a beginner can handle this project: detailed instructions will tell you how to make a stylish clay pot for live or decorative plants. You can create such a craft together with your child.

The photo shows a flower pot made with your own hands from clay and painted with acrylic paints. The design of the finished product can be anything – it all depends on the author’s imagination.
Tools and materials
To create a flower pot you will need:
- Clay. If it is possible to fire the craft, ordinary modeling material will do. Otherwise, it is better to buy clay that does not require firing.
- A container the size of the pot.
- A knife.
- A rolling pin.
- Brushes and paint.
- Varnish.

Step-by-step instructions
Let’s start making:
- Make the bottom of the pot. To do this, roll out the clay into a layer and place the prepared container on it. Using a knife, cut the clay to make a circle.
- Mix the remaining piece of clay and roll it into a long strip. Use a knife to shape it into a rectangle.
- Make the walls by connecting them to the base. Press the pieces firmly but carefully against each other.
- Smooth out all the seams with water.
- Wait for the clay to dry. The time depends on the material used. It usually takes about two days to harden. In the process, turn the product over so that it dries evenly.
-
Decorate the pot with paints.
-
Mix them with water and cover the bottom of the product.
-
Spray black paint with a wide brush or toothbrush.
-
When the paint dries, the finished flower pot should be protected with varnish.
- If the product has not been fired, a plastic container should be placed inside, in which flowers can be planted.


Decorating the pot with paints.
Decorating the pot with paints.

Mix them with water and cover the bottom of the product.
Mix them with water and cover the bottom of the product.

Spray black paint with a wide brush or toothbrush.
Spray black paint with a wide brush or toothbrush.

When the paint dries, the finished flower pot should be protected with varnish.
Once the paint has dried, the finished flower pot should be protected with varnish.


Stone flower pots made of plastic
Great plant pots with imitation moss can be made from ordinary jars and relief paste. To create a naturalistic decor, you will also need multi-colored acrylic paints, brushes and stencils.
Flower pot in ethnic style
The craft will not require any financial investment: you will only need a plastic bucket and old T-shirts. The finished craft will become a bright decoration of the room and inspire new creative feats.

Tools and materials
For work you will need:
- Any plastic or glass jar of suitable size.
- T-shirts from which you need to weave a thread.
- Scissors.
- Hot glue gun.

Step-by-step instructions
The most difficult thing when making a flower pot with your own hands is learning how to make patchwork thread, but once you understand the principle of weaving, you can easily cope with this task. Patchwork thread is suitable not only for decoration, but also for creating a rug with your own hands. Let’s get to work:
- Cut unnecessary T-shirts into strips about 2 cm wide. Tie two patches together.
- Place the strips in your left hand. Rotate the top strip away from you, then wind it around the bottom strip, but twisting it towards you.
- When the patches are twisted, put a new strip inside the old one and wind it in the same way.
- Over time, weaving from patches will turn into a pleasant, meditative activity.
- Drill drainage holes in the plastic container. After that, we begin decorating. Glue the end of the thread to the top edge and begin winding it around the jar.
- Secure the thread with glue at equal intervals. Continue until the entire container is closed.
- Now you can plant plants in the finished flower pot. Instead of thread, you can use any rope.


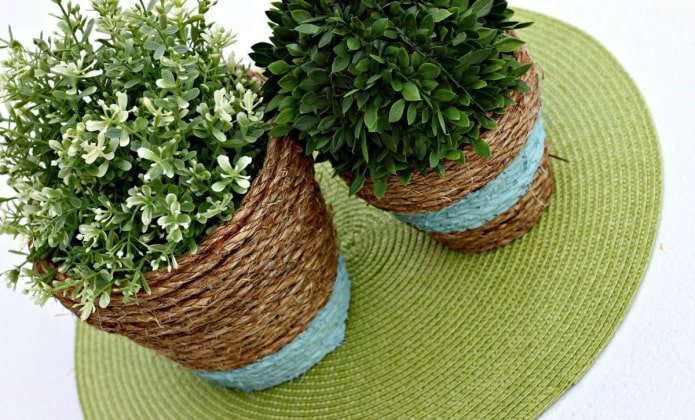
The photo shows eco-style flower pots decorated with jute rope and paints.
Flower arrangement from a vintage suitcase
A thing that has served its time can easily turn into something stylish and useful when it falls into the caring hands of a master. How to turn a suitcase into a flowerpot, we will tell you in the next master class.

The photo shows a transformed suitcase, which has become the highlight of the interior.
Tools and materials
For work you will need:
- An old suitcase.
- Primer, acrylic paints, brushes and varnish.
- Film.
- Scissors.
- Furniture stapler.
- Expanded clay, soil and plants.

The photo shows tools and materials for creating the composition. The film can be found in a hardware store. The number of plants depends on the dimensions of the suitcase.
Step-by-step instructions
Let’s get to work:
- Wipe the suitcase with an alcohol solution. If necessary, remove the lid. Cover the surface with primer in two layers, and after drying, paint in any color. To make the item last longer, it is worth protecting it with parquet varnish.
- To prevent water from spoiling the suitcase, line its bottom with thick film. We fix it with a furniture stapler along the top edge.
- We fill the bottom of the suitcase with expanded clay and soil and plant the plants. To make the composition look harmonious, we place taller flowers in the background and short ones in the foreground.
- The plants should be unpretentious and get along well with each other.
- The garden in the suitcase is ready!


The photo shows a duet that always looks picturesque and harmonious.
Flower steampunk style flowerpot
An impressive container for house plants can be made from a plastic bucket, foamiran, screws and dry peas. You will also need glue, putty, acrylic paints and varnish.
In the age of universal automation, hand-made products, into which the master puts a piece of his soul, are increasingly valued. DIY flower pots will serve as a wonderful decoration for any interior and will give a feeling of coziness in the house.
Now reading:
- 11 unusual options for replacing tulle for stylish window decoration.
- Toilet decoration ideas: walls, floor and ceiling in 41 variants (41 photos)
- Ultimate Guide to Buying a Used Tesla Model S
- Kitchen curtains: 100 photos in the interior and fashion trends of 2024.
- Stretch ceilings: advantages, disadvantages and common misconceptions.