How to make a walnut topiary?
Any homemade “tree of happiness” consists of three elements: a base, a trunk and a crown. Each of the components can look different, hence the variety of compositions.
We will tell you how to make an unusual tree from nuts in the following master class:

The photo shows a DIY topiary from walnuts in an eco-style with a decorated flowerpot.
What do you need to prepare?
For work you will need:
- A container of a suitable shape (flower pot);
- Branches or Chinese sticks.
- Walnuts in shell.
- Floral sponge.
- A ball of rope or vine.
- Threads.
- Acrylic paint and brushes.
- Glue gun.
- Decor for masking the floral sponge (sachet).

Step-by-step master class for beginners
Let’s start making the topiary:
- Use scissors to cut out branches for decoration. flowerpot.
- We tie the twigs together:
- As a result, we get the following product:
- We make a trunk from three tied branches:
- We secure it in the workpiece, gluing it for reliability:
- We paint the nuts in any color. For us, it is a universal white:
- We let the nuts dry, then glue them to the ball. Hot glue is ideal for this:
- We fill the pot with floral foam:
- We secure the tree inside:
- We decorate the pot with branches. First, coat it with glue so that the workpiece holds more firmly:
- Cover the joint with a sachet or any other decorative material:
- A topiary made with your own hands will look good not only in the kitchen, but also in any living room.


Coffee Bean Topiary
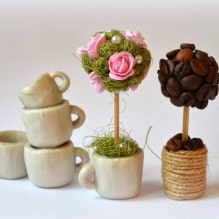
This composition is a great addition to the room design, and also symbolizes well-being and happiness. A fantasy topiary made of coffee beans will be a pleasant surprise for a woman or a man.
When creating a topiary from coffee beans with your own hands, you can use not only a ball, but also other shapes: a heart or a cone. Special foam blanks are sold in craft stores, but you can also make them yourself. Cinnamon sticks, dried orange slices, and cloves are great as decor.

The photo shows a fragrant coffee topiary, the crown of which is decorated with beans. The trunks are two branches, and the flowerpot is covered with moss and artificial plants.


Topiary from pine cones
The material for such a tree of happiness can be found literally under your feet. The cones need to be collected, washed in water and dried for 10 minutes in an oven preheated to 300-350 degrees. A topiary made of pine cones is quite easy to make and does not require any financial investment; it can be taken to a kindergarten or school as a craft made from natural materials. It will also serve as a great addition to a New Year’s gift.
To ensure that the pine cones hold securely, they are glued to the tips of pins or toothpicks and inserted into a foam ball. You can also paint the pine cones: with a brush or spray paint.

The photo shows a topiary crown made with your own hands and decorated with acorns, beads and ribbon bows.


Topiary from shells
To prevent shells brought back from vacation from gathering dust in a vase, they can be turned into an unusual tree that will perfectly fit into a marine style interior. This video describes how to create a topiary with your own hands for beginners. A newspaper tightly wrapped with twine is used as a base for the crown. The author of the master class shows how to make a stable structure without purchasing special materials for this.
Topiary from satin ribbons
This inexpensive but exquisite material is easy to work with. Ribbons of any size and shade are sold in a sewing store. You can make flowers, bows and leaves for the composition from them, and decorate the empty spaces between them with beads or decorative buttons.
A delicate or, conversely, bright tree made of satin ribbons of different colors can be created after watching this educational video:
Topiary from napkins
Modern craftswomen come up with new types of topiaries, surprising with their ingenuity. Thus, felt fabric, organza and sisal, as well as feathers and even ordinary napkins are used to create flowers.
This video presents a step-by-step master class on making a topiary from napkins:
Topiary from corrugated paper
Colored paper, twisted in a special way, easily turns into an effective decoration for the crown of a tree. Finished elements are fixed to the base with a toothpick or glued to it. From corrugated paper you can make realistic flowers – roses or peonies, and since the paper and foam ball are lightweight, the topiary can be of any size. A large floor composition made of paper flowers looks impressive and can serve as an excellent decoration for a romantic photo shoot.

The photo shows an interesting topiary made with your own hands from corrugated paper with the addition of cold porcelain roses.


Topiary made of candies
Such a gift will be appreciated by those with a sweet tooth, as well as little guests at a children’s party. When making the trunk, you can use pencils wrapped in ribbons, and as a container – a roomy mug, then the gift will be not only tasty, but also useful.
Edible compositions of marmalade, fruits, berries and candies without wrappers look impressive. To secure the elements, skewers are used, which are strung on a foam ball.

The photo shows a topiary made of chocolates in paper packaging. Wide ribbons are used for decoration.


Topiary from coins
A real money tree will become an impressive decorative item if you lay out the coins carefully and cover the finished composition with paint with a metallic effect. To create a curved trunk, you can take a thick wire and wrap it with twine. Coins, mini bags and banknotes are suitable for decorating the pot.

The photo shows a tree made of small coins. The ball is based on a foam ball.


Flower Topiary
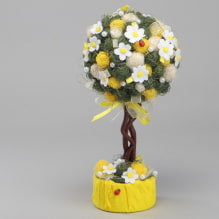
The most popular version of the tree of happiness is the flower one. With the help of high-quality artificial flowers, you can create compositions of any size: a small one can be placed on a chest of drawers or a bedside table, and a large one on the floor.

The photo shows DIY topiaries in pots made from flowers, fruits, ribbons and organza.
Tools and materials
To create a spectacular topiary from artificial flowers, you will need:
- Flower pot.
- Styrofoam ball.
- Flowers and berries.
- Sisal.
- Blanks for the trunk.
- Glue gun.
- Plaster or alabaster.
- Acrylic paint with colors, brush.
- Hand saw, awl, side cutters.
- Masking tape.
- Felt-tip pen.

Step-by-step instructions
Let’s get to work:
- Draw two circles to mark the area without decoration. Here we will insert two branches.
- Separate the flowers from the stems, leaving 2-3 cm.
- In this way, we prepare all the buds, leaves and berries.
- Roll several balls from sisal.
- For the largest flowers, pierce holes with an awl, coat the stems with glue, connect:
- Fix the medium-sized elements. To do this, coat the ball with glue, press the flowers:
- Lastly, glue the small leaves and berries. To give the “bouquet” volume and fill the voids, you need to add sisal balls.
- Saw off the wooden blanks of the desired size. They look best when intertwined. We fasten them together with masking tape for a while.
-
We make holes in the foam ball using branches, pour glue in there and fix the future trunk:
-
We dilute the alabaster, pour the solution into the pot, not reaching its edge.
-
We insert the trunk and hold it until the mixture sets. It usually takes about 3-5 minutes. The entire solution hardens completely within 24 hours.
-
We cover the tree legs with acrylic paint.
-
To complete the craft, we hide the alabaster under the sisal tape, carefully gluing it in a circle: from the center to the edges. Trim off the excess.
-
The spectacular topiary, assembled with your own hands, is ready!


We make holes in the foam ball using branches, pour glue there and fix the future trunk:
We make holes in the foam ball using branches, pour glue there and fix the future trunk:

We dilute the alabaster, pour the solution into the pot, not reaching its edge.
We dilute the alabaster, pour the solution into the pot, not reaching its edge.

Insert the barrel and hold it until the mixture sets. Usually it takes about 3-5 minutes. The entire solution hardens completely within 24 hours.
Insert the barrel and hold it until the mixture sets. Usually it takes about 3-5 minutes. The entire solution hardens completely within 24 hours.


To complete the craft, hide the alabaster under the sisal tape, carefully gluing it in a circle: from the center to the edges. Cut off the excess.
To complete the craft, hide the alabaster under the sisal tape, carefully gluing it in a circle: from the center to the edges. Trim off the excess.


A Selection of Unusual Ideas
Previously, topiary was the name for large trees or bushes trimmed into fancy shapes. Today, this art is available to everyone, since any interesting objects can be used to decorate a topiary made with your own hands.
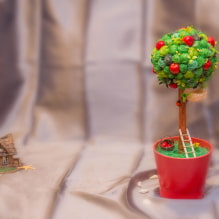
Unusual topiaries are created from tangerines, wax vegetables and even garlic; crowns are formed from cotton bolls, decorative Easter eggs or Christmas balls. They create compositions with tiny houses, ladders and birdhouses, adding figures of gnomes and birds – as we can see, the possibilities for creating a topiary with your own hands are endless.
Topiaries with an original appearance are presented in our gallery. We hope that these ideas will inspire you to be creative.


Now reading:
- Your Ultimate Guide to Buying Used Subaru Cars
- Modern Stretch Ceiling Designs for Bedroom (88 Photos)
- Staircase Lighting in the Interior: 58 Photos and Creative Ideas for Steps
- Beds with upholstered headboards: more than 60 photos of interiors, ideas for bedrooms and children’s rooms
- Smooth stretch ceilings: 100 ideas and photos in the interior