What are the pitfalls?
It is not difficult to paint the tiles in the bathroom with your own hands, it is much more difficult to do it well. So that the coating does not crack and does not peel off the surface after a short period of time.
The first thing to consider is the water resistance of the material. Even if you are painting ordinary walls in the bathroom, you need washable and super-resistant paint, not to mention painting tiles. You will find out which composition is best in the next section.
The next important nuance is a smooth, non-porous surface. Glazed ceramic tiles are not intended for painting – the paint will not be able to penetrate it, which means it will not hold firmly. Fortunately, there are special primers – they are suitable for non-porous glossy surfaces, adhere firmly to the wall, and improve paint adhesion.

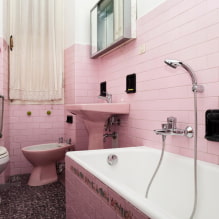
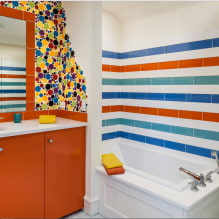
The photo shows repainting colored tiles white
The last important detail is easy maintenance. Wall and floor coverings in the bathroom must withstand not only water – they will have to be washed more often than others. Saving money on repairs in this case can affect the quality and durability of the painted coating.

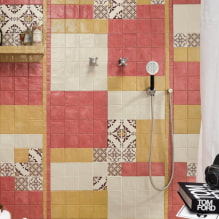
The photo shows red walls in the bathroom
What can you paint with?
50% of the success in painting tiles lies in choosing the right materials, 45% in high-quality preparation of the base and only 5% in the skills of the master. Let’s start with the first and most important thing – choosing paint.
Look at the instructions for painting the ceiling.
Oil paints
The cheapest product, known since ancient times. Oil compositions differ from others by the presence of a sharp smell: it is quite difficult to work with them, especially in a closed, unventilated space. But after drying, there is no smell, and the surface is a durable film that will remain unchanged for many years.
The colors of the paints are mainly factory-made, ready-made: but you can also tint them yourself in the desired shade, choosing a can of white tone.
Important! Light shades may change color over time, turn yellow: therefore, it is better to choose white and other neutral tones in the form of latex or epoxy paints.

Latex paints
Latex is a pure polymer that is waterproof and highly flexible. Paints containing rubber additives have the same characteristics: they do not let water through, are easy to clean, and hide cracks and small surface defects.
Despite the “rubberized” texture, latex paints breathe, which means they can maintain the microclimate in the bathroom. However, there are also disadvantages: mold and mildew can form on the surface. Another disadvantage is low resistance to light, so if there is a window in the room, it is better to choose non-fading epoxy enamel.

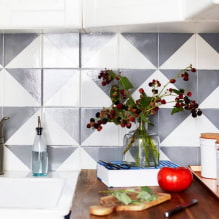
The photo shows a latex paint option
Epoxy paints
The most durable and long-lasting option is an epoxy composition. It has the properties of resin, only easier to use. Although applying paint cannot be called easy – if you need a really high-quality result, entrust the work to professionals who already have experience working with epoxy.
When applied to ceramic tiles, epoxy paint creates a waterproof, fire-resistant, resistant to mechanical abrasion and fading plane.

How to paint with your own hands?
When the enamel is suitable in price and quality, you can paint! But before starting work, you need to prepare everything you need. In addition to the can of paint itself, you will need:
- protective film to cover furniture and plumbing;
- masking tape (we will use it to protect joints with the ceiling, floor, countertop);
- brush + roller or airbrush (tools are selected depending on your skills);
- a tray the size of the roller;
- grout to prepare the seams for painting;
- acrylic or other primer for non-porous surfaces;
- varnish, if you need to additionally protect the finish.
In addition, arm yourself with protective gloves, a respirator (if you work with strong-smelling compounds) and a solvent – you can quickly remove paint if you accidentally stain the room or get dirty yourself.
Step-by-step instructions
In any finishing work, the preparation stage is almost the key: the beauty of the application, the service life of the paint and other important characteristics will depend on how well you prepare the ceramic tiles.
The preparatory stage includes:
- Cleaning. Simply washing with a damp cloth is not enough – you should clean off dirt, mold, fungus, wash off dust. Use special compounds, such as gels or powders for bathrooms.
- Sanding. Even with a special primer, paint will not adhere well to overly glossy glazed tiles. To improve adhesion, go over the surface with sandpaper.
- Grouting. The seams should be given special attention – clean them with a brush, tap them, remove chipping elements. Apply fresh grout and renew the spaces between the tiles, let dry.
- Protection. Time for masking tape – tape over all the joints that need to be protected – with the ceiling, floor, walls, plumbing, furniture.
- Degreasing. To ensure that all subsequent layers adhere better, the coating should not only be dusted off beforehand, but also degreased. Regular solvents or industrial alcohol will do.
- Primer. The final preparatory stage – use a roller or brush to spread a thin layer of primer over the entire surface. Leave to dry, the time is indicated on the package.


The photo shows painting a wall with a roller
It’s high time to apply paint. This simple task also has certain tricks:
- Choose a tool. Brushes often work poorly – they leave marks, and it is almost impossible to create an even coating with them. Not everyone knows how to use an airbrush. Therefore, the best option would be a roller, in addition to which they take a small brush for corners and hard-to-reach surfaces.
Important! Rollers come in different types, choose the one that suits your paint and varnish materials. Consider humidity and temperature. Usually, the packaging indicates the conditions in which it is best to work.
- Start with the corners and joints. Use a small brush to paint all the corners and hard-to-reach places, and then roll up the main area with a roller.
- Move from the top corner. Always start painting from the top, gradually moving down to the lowest point.
- Let the surface dry. This applies to both the time between layers (you will have to apply at least two layers) and the period of complete drying – you cannot wash during this time.
The last step is to apply a protective varnish (if used) and remove the masking tape.
Video
Watch the instructions on how to quickly and inexpensively update the interior of an old bathroom by painting the tiles on the walls and floor:
In this video, you will find step-by-step instructions for painting old tiles:
Beautiful examples for inspiration
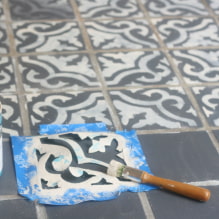
The easiest option is to cover the tiles with an even, single-color layer, but if you want to create an original design, use stencils. This idea is easy to do and will not cost much, and there are a great variety of patterns in stores – from flowers and geometry to children’s drawings.
If you have artistic talent, you can do without a stencil, simply depicting any motif you like on the walls.
Another simple way is a repeating print. It is easy to draw dashes, dots, stars, stripes on tiles yourself.


The photo shows the result of using stencils on the floor
Approach repainting tiles with all responsibility, prepare the tiles and use high-quality paint – then your work will last for many years.
Now reading:
- 15 Creative DIY Garden Decoration Ideas.
- 10 Original Ways to Decorate a Front Garden to Transform Your Yard
- Using Wall Moldings in Interior Design: 50 Inspiring Examples
- Design of a one-room apartment for families with children: 33 inspiring photos of interiors.
- Apartment design ideas 60 sq. m: layouts and more than 70 interior photos