Pros and cons of backlighting
Backlighting of cabinets in the kitchen has its advantages and disadvantages:
- Bright light in the work area makes the cooking process more comfortable.
- An additional light source helps to visually expand the space.
- The LED strip replaces the night light, which is convenient in the dark.
- A large selection of LED lamps allows you to find a suitable model for any taste, style and color.
- If the brightness is chosen incorrectly, the LED backlight may not be enough or, conversely, it will blind.
- The need to hide the power supply forces you to resort to architectural tricks.
- The LED strip in the kitchen requires a conveniently located switch, which also complicates the installation (we will discuss it in detail below).
Be sure to look at the internal options filling kitchen cabinets.

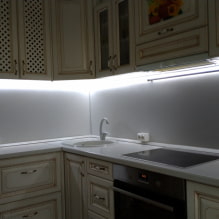
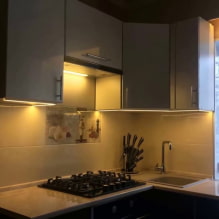
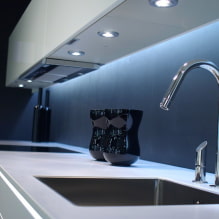
The photo shows lighting for a glass apron
What lighting options are there?
There are 3 types of LED lamps for kitchen cabinets.
Check out our article on organizing lighting in the kitchen.
Spotlights
Round, square, rectangular — they can be either built into the bottom of a drawer or mounted on top of it. Spotlights look good both under cabinets and under open shelves. To ensure sufficient light, select the appropriate brightness and place the sources at the appropriate distance from each other.
LED panels
There is no better option for achieving soft, diffused, uniform light. Unlike strips or spotlights, panels usually occupy the entire bottom surface of the cabinets, ensuring a uniform flow of lumens. The panels do not heat up, are safe for the eyes, and last about 50,000 working hours (~15 years). They are easy to install and maintain. The only drawback is the relatively high cost.
Important! Any LED lamps, strips or panels, are energy-saving. They consume much less energy, in comparison with conventional incandescent lamps and even energy-saving lamps.

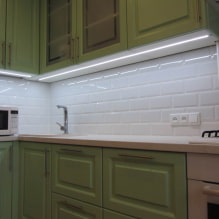
The photo shows spotlights


LED strip
An affordable option with a low price. Just like the panels, strips do not emit heat and serve for many years. They can be installed anywhere:
- the corner between the apron and the bottom,
- in the center of the bottom,
- near the front edge.
At the same time, you can install the lighting in the kitchen under the cabinets yourself, without the help of specialists. The only disadvantage of strips is the serial connection. That is, if one LED burns out, all will stop working – which means the strip will have to be completely replaced.
Important! Any lamps used to illuminate the work area must be marked IP65 or higher. This marking confirms that the equipment can be used in damp rooms.

Where is the best place to place it?
Depending on its location, lighting in kitchen cabinets performs various functions.
Above the work area
In this case, the lamps are mounted in the center of the cabinets (built-in) or closer to their front side (overhead). Then the light will fall downwards, creating the right effect and helping to concentrate the eyes on preparing food: cutting, peeling, etc.
Tip! In order not to spoil the appearance, order a special “threshold” together with the cabinets, which will hide the lamp housings.

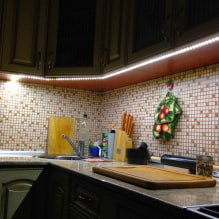
The photo shows the lighting in the corner under the cabinets


On the apron
Since the main purpose of such lighting is still decorative, the apron should also be suitable. Suitable for:
- splashbacks with patterns;
- solid-color tiles;
- textured surfaces.
Of course, part of the light will fall on the countertop, so you can illuminate the apron even if there is a slight lack of light in the kitchen.
The strips are usually attached from above, but you can add them from below and on the sides.
In the baseboard
Not the best way to add lighting, because:
- Bottom-up lighting will blind.
- The work area will not become brighter.
- The lower location will highlight any debris, dust and other imperfections of the countertop.

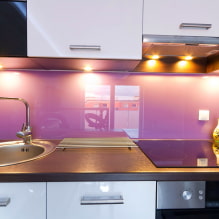
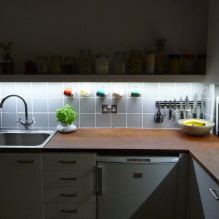
The photo shows lighting for a dark apron
Which switch would be more convenient?
Let’s start with which option is best to avoid. The most impractical switches for lighting in the kitchen above the work area are those with motion sensors. They are supposed to be as convenient as possible and turn on the light every time someone enters the room.
In reality, there is no need to turn on the lighting every time, and the equipment works intermittently and can turn off while you are cooking something and are practically motionless (for example, standing still, cutting).
Of the other methods, all are generally suitable, but before installation, check whether it will be convenient for you to turn the backlight on and off in this particular place several times a day. For example, placement under the bottom of a wall drawer is not always convenient, especially if there is a protruding decorative threshold along the bottom.
Switches can be mounted on a cabinet, on an apron, on a nearby wall, or be recessed into the countertop. The last method is the most controversial, because it is not always easy to bring the wire to the table. Plus, the insert will have to be sealed, and this is additional work.
Advice! Pay attention to switches with a dimmer – they require more space for installation, but you can adjust the brightness of the backlight at different times.

The photo shows a switch on the apron
The button on the apron is the most practical: nothing threatens the switch, it is convenient to press, it does not interfere with work. One “but”: wiring. If it is easy to run it under a glass or MDF panel, then with tiles or mosaics there will be difficulties – most likely you will have to run it outside and hide it in a cable channel, which cannot be called the height of aesthetics.
To avoid pulling the wire, place the button directly on the cabinet: below, on the side (if the side does not rest against the wall or other furniture), in front (on the same decorative threshold).
Tip! Touch switches look modern and stylish, but they may not respond to touches with wet hands, which is not uncommon in the kitchen. Therefore, conventional push-button models will be more reliable.

The photo shows a switch on the end of the furniture
How to do it yourself?
It is not difficult to attach LED lighting, the main thing is to have all the necessary tools and follow the instructions.
Tools and materials
The main thing that you cannot do without during installation is the LED strip itself. When choosing, pay attention to the following parameters:
- Color. LED strips glow in the RGB model. Diodes are white, red, blue, green. Other shades are obtained by turning on several main shades at once. There are RGB strips – they are colored, or WRGB – with colored and white diodes. However, the most suitable for the kitchen are ordinary white ones, which in turn are divided into warm and cold.
- Flux. Brightness is measured in lumens – the more of them, the brighter it will be when the strip is turned on. This parameter depends on the type of LEDs and their number, as well as the density of the arrangement. There are 2 main types: SMD3528 (without RGB) and SMD5060 (5050). The first ones are smaller and are placed more often, the second ones are larger and are placed less often. A standard SMD5060 or SMD3528 double-density strip is suitable for backlighting.
- Protection. Let us remind you once again that for a long service life in the kitchen, models with IP65, 67, 68 markings are required.
In addition to the strip with diodes, you will need a power supply (adapter), a switch, a wire for connection with a margin (cross-section ~ 2.5 mm), a plug into a socket (or a cable brought out of the wall), electrical tape, double-sided tape or other fastener. The tools you will need are scissors, a screwdriver, pliers, a soldering iron.
Important! The LEDs operate at 12 volts, not 220, so you will need to install a transformer.

Step-by-step instructions
6 steps for successful LED strip installation:
- Cut off the required length. This should be done exclusively at the location indicated on the strip itself. Usually, orange marks are located every 3-4 LEDs, scissors are often drawn on them.
- Connect the cable and power supply. The safest way is to expose the contacts on the strip and solder the wire, but you can also use connectors.
- Insulate. A mandatory step for the kitchen to protect the connection from excess moisture. Use electrical tape or special tubes.
- Attach in place using a level. The method depends on the specific model, some aluminum profiles have an adhesive side. If not, use double-sided tape.
- Connect the electricity. Insert the plug into the socket or connect the tape to the wire coming out of the wall, turn on.
- Complete the installation. At this stage, you should attach the switch, secure and hide the adapter, put a transparent or matte diffuser on the profile.
Important! Don’t forget about safety precautions: install with the power off, observe polarity, insulate all exposed wires immediately.
Video
To understand the LED strip connection diagram in more detail, watch the video on using a socket for a hood:
Design ideas
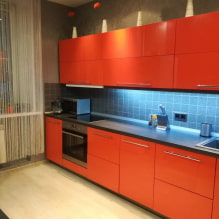
To prevent the backlight for kitchen drawers from looking dim, play with color: choose a WRGB strip with white and colored diodes, with the ability to adjust the desired shade. When you don’t need to cook, turn on colored light that matches the accents in the interior.
If you want even the least bright backlight to become brighter, combine it with a glossy apron made of glass or tiles. These materials reflect the flows, increasing the overall power of the glow.
Look at examples of glossy kitchen design and why it is better than matte.


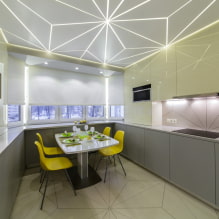
Does one line of lighting seem boring? Lay additional lighting along the top of cabinets or shelves, or install the system in the kitchen base.

The photo shows a decorative backlighting rim
LED kitchen lighting is an effective and aesthetic solution that can be installed in just 1 hour and will help create a comfortable atmosphere for cooking.
Now reading:
- Gray Living Room: 55 Inspiring Photos and Design Ideas for Decorating.
- Glass tiles: more than 50 photos of interiors for bathrooms and kitchens
- Top 23 Popular Furniture Colors: Name, Features, and Combination Tips
- Explore the Versatile Ford Tourneo Custom Van
- Types of foam blocks: advantages, disadvantages and differences from gas blocks.