What rules are important to follow?
When doing the work yourself, you have to look for answers to all your questions on the Internet or from professional friends. I have collected all the basic rules and listed them below:
- The air conditioner and fan are turned off until the glue has completely dried.
- Doors and windows remain closed to prevent drafts and keep the air humid.
- Pregnant women are not recommended to glue wallpaper so that stale, humid air does not cause dizziness.
- The air temperature in the room is not lower than +15 and not higher than +32. A slight deviation is allowed.
- It is prohibited to heat an unheated room with a heater. Heating must be on.
- The drying time of wallpaper pasted on a cold wall increases by 2-3 times compared to the normal period.
- The ends of the strips at the ceiling and floor are cut with a stationery knife, which is drawn along the attached wide metal spatula.
- To determine whether it is possible to glue without adjusting the pattern, you need to read the markings on the packaging.
The sheets are oriented vertically. Wallpaper pasted horizontally is too heavy wide strips that are poorly fixed with glue on the wall. In order for the process to be smooth, first of all, you need to take care of the availability of the required props, which will be needed for the work performed in stages.

What tools will you need?
So, prepare the following inventory:
- polyethylene film to cover the floor;
- a deep container for diluting the glue and a tray for rolling;
- brushes and rollers for applying glue to the walls;
- rubber rollers for rolling places joints;
- wallpaper knife and scissors as a cutting tool;
- building level, plumb line, large ruler or laser level;
- pencil, pen or marker for marking;
- wide spatula used when adjusting the length of the pasted strip.
All of this must be purchased before installation begins. The primer and glue are purchased before the sheets are cut, and in the amount required for the entire volume of work.

Which glue is better to choose?
The cleaned and primed surfaces are covered with an adhesive aqueous solution. The consistency of the glue should be viscous enough for the wallpaper to adhere across the entire width of the canvas, but the solution should be fluid so that it can be applied evenly to the surfaces being treated.

How to dilute the glue?
To be able to qualitatively treat the wall surface, you need to dilute the granular mass with water. The instructions and dosage are indicated on the packaging, but the general instructions are as follows:
- Pour room temperature water into a bucket or other deep container.
- Form a funnel in the water by simply stirring the water in the bucket with any clean long object.
- Pour the glue evenly in a small stream in proportion (on average, 1 kg of glue per 20-25 liters of water, be sure to look at the exact proportions on the packaging).
- Stir the glue thoroughly and intensively to prevent lumps from forming.
- Let it sit for 15-20 minutes.
The solution is prepared immediately before gluing the wallpaper. The optimal amount is for 3-4 stripes.
What order should I follow, or what comes first?
When performing work, it is important to follow the correct sequence of actions. This applies to the order of finishing the walls, ceiling, installing door frames, windows, baseboards, flooring, etc.
Wallpaper or installing a stretch ceiling?
The ceiling structure is mounted before it is time to glue the wallpaper. This is necessary to avoid damaging the already pasted strips during installation.
Wallpaper or flooring? (laying laminate, linoleum, parquet)
First, the floors are installed. Laying the screed means introducing dirt into the room, which will inevitably get onto the new walls.
Wallpaper or door installation?
The door frame must be installed before gluing the wallpaper. The trims are not needed yet. They will cover the cut areas when adjusting the sizes.
Wallpaper or baseboards (moldings)?
Overhead baseboards are installed last, after the room has been papered.
Step-by-step instructions
After preparing the walls and installing all the necessary elements, the room is cleaned. But at this stage we do not start gluing yet, but carefully begin to prepare the room.
Preparatory work
- First, remove the shelves, furniture and equipment from the room.
- If anything is left, cover it with film on top to protect it from dust, finishing materials and glue.
- Unfasten the sockets and switches.
- Remove the baseboards and door frames.
- Also cover the floors with plastic film. This will prevent damage.
Features of preparing walls and ceilings for gluing
Beginners need to take into account that the wall surface must be completely cleaned and prepared. To do this:
- Remove dirt and remnants of the old decorative coating.
- Putty the plane, eliminating cracks and other irregularities.
- Prime. It is easier to apply the primer with a soft roller.
- Wooden walls are treated with antiseptic disinfectants.
The primed surface must dry completely. Only then can you start gluing.
Nuances depending on the surface
The table shows the types of surfaces on which you can immediately glue the wallpaper, but you need to take into account a number of features:

Inspection for cracks and irregularities
If defects are found, remove the falling pieces. If there is a lot of damage, you will need to completely remove the plaster.
Small irregularities and chips are hidden with gypsum plaster. After 30 minutes, additionally cover with putty for final alignment. Wait until it dries and treat the surfaces with a plaster float. Clean the walls from dust with a brush and cloth.
Do not skip the priming stage. This will not only prevent mold, but also reduce glue consumption. Apply the composition from the bottom up with a roller on the main surface and with a brush in the corners. Wait until it dries, the average time is 12-15 hours.

Where to start gluing?
Before cutting the wallpaper, you need to mark the room, marking the places of future joints with lines. If the room has windows, the first strip is glued level from the window. Next, we mark to the corner, and so on in the same direction to the door. Having gone around the doorway, the strips are laid further to the same window. The places under it and above it are pasted last.
When the preparatory treatment of the walls in the hallway or other room without windows is completed, the walls are also marked before gluing the wallpaper. In this case, the doorway can be used as the starting point (if there is enough space nearby to lay a whole strip without bending it longitudinally). Another way is to glue from the corner.

If there is a pattern on the wallpaper that requires matching at the joints, start gluing in an inconspicuous area. For example, where you will later place a wardrobe, or behind the curtains. This will prevent possible image mismatches. The distance between the outer stripes may be too narrow to fit the pattern.
Marking Features
For convenience, lines are often drawn with a marker or pencil beforehand. When in contact with moisture, they are projected onto the edges of the wallpaper. This can be avoided by using a laser level or by applying markings with barely noticeable light strokes.
Wallpaper Calculations and Cutting
To determine wallpaper consumption, find out the perimeter of the room. Measure the length of each wall, then add them together and round up the resulting sum. Wide windows and doors are not taken into account in the calculation. For example: 2.95 + 3.1 + 3.05 + 0.6 = 9.7 ≈ 10.
- To find out how many strips you need, divide the perimeter value by the width of the roll. 10 / 1.06 = 9.4. After rounding, you get 10 strips for wide wallpaper, or 10 / 0.53 = 18.8. That is, 19 canvases for narrow ones.
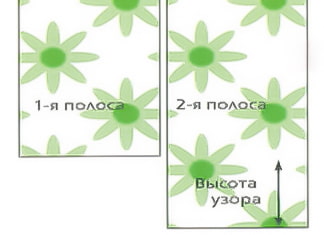
- By dividing the length of the roll by the strip, you can calculate the total number of the latter. For wallpaper without an image, the length of the strip is related to the height of the wall, to which you should add a reserve of 0.2 m. 10 / (3.1 + 0.2) = 3.03 ≈ 3. If the image needs to be joined, another rapport indicated on the label is added. 10/(3.1+0.2+0.3)=2.7≈2.
- Divide the number of strips required for pasting by the number of strips in a roll. For wide wallpaper, the formula is: 10/3 or 10/2. For narrow wallpaper, 19/3 or 19/2.
A spacious table will be suitable for convenient cutting of wallpaper and applying glue to it. If you are working on the floor, make sure it is clean.
Using a tape measure, measure the distance from the floor to the ceiling, add a 10 cm reserve to it. Cut the canvas with a utility knife or sharp scissors. The line should be as straight as possible.
If you need to adjust it to the pattern, do it differently. Take strips parallel from two rolls at once, which will save material. Do not throw away the scraps. They will come in handy around windows or above doors.
How to glue correctly?
- Close windows and doors carefully. Drafts can easily peel off the wallpaper. The labels on the rolls indicate where to apply the glue. They also indicate the time required for the material to soak in.
- Move from the ceiling to the floor, leaving 5 cm to then tuck the wallpaper under the baseboards. A dry roller is suitable for smoothing the coating. Roll it from the center to the edges and from top to bottom. Try to avoid the formation of air bubbles. If they appear, carefully try to remove them by smoothing the surface.
- When distributing the next strips, focus on the edge of the previous one. Glue paper wallpaper with a slight overlap, while place denser coverings tightly. To avoid visible joints, go over them with a rubber roller. Remove any remaining glue with a damp cloth.

How to properly cut off excess?
Protruding pieces of wallpaper near the ceiling and floor should be carefully cut off.
- To do this, press them tightly against the edge of the baseboard. A fold should form, which will become a line for cutting.
- Remove excess parts with a stationery knife.
Links to detailed instructions:
- Paper;
- Non-woven;
- Vinyl;
- Liquid;
- Photo wallpaper.
Each type involves the use of a specially developed gluing technology.
How to glue wallpaper with pattern matching?
It is important to take into account a number of features:
- The marking contains information on the size of the pattern offset.
- The strips are cut with a margin of the specified number of centimeters.
- After gluing, check that the pattern matches.
- If necessary, the wallpaper is separated and glued with the correct offset.
The excess stock is cut off with a wallpaper knife along the attached wide metal spatula.
How to glue butt to butt or how to hide joints?
To do this, you need to:
- Be sure to glue on a flat surface.
- Fit the wallpaper as closely as possible.
- Roll the joints with a special roller.
- Wipe off any excess glue.
To prevent the joints from peeling off, thoroughly coat them with glue before gluing.
Nuances of overlapping gluing
The following factors are taken into account:
- The strip that is covered with the overlap is on one side.
- The top of the wallpaper is generously coated with adhesive.
- Roll the joint with a rubber roller with pressure.
- Wipe off excess glue completely.
To make the overlap invisible, start gluing from the door to the far corner of the room so that the ends of the wallpaper are not visible.

Technique for pasting meter-long wallpaper
There are several factors typical for wide wallpaper:
- The glue is applied only to the wall.
- If mistakes are made, you can remove the fresh canvas and paste it again.
- It is difficult to do the work alone.
- The material allows you to adjust the joints by smoothing.
How to paste alone?
This is convenient when the wallpaper is thin, light and not wide. In this case:
- The coated strip is folded so that the upper third of the impregnated side remains open.
- The wallpaper is applied from the top and smoothed from top to bottom.
- The folded part is unfolded and pressed to the floor along the longitudinal axis.
- Air and excess glue are driven out from the middle to the edges, gently pressing with the palm.
After this, the joints are rolled with a roller.
Video instructions
How to glue in hard-to-reach places?
The features depend on what is difficult.
Corners
The processes of pasting internal and protruding corners are technologically different. Detailed information on gluing corners can be found here.

On the ceiling
The technology is specific and requires separate consideration. The main thing is to glue from the window into the room. Detailed information on wallpapering the ceiling can be found in my separate article.


Behind the radiator
Fragments are cut, wallpaper and wall are coated, gluing is carried out according to the developed technology.

Around the window (under window sill)
We prepare a canvas, from which the outline of the window opening is cut out, which is covered with wallpaper. Individual elements are glued and prepared according to the sizes of the uncovered areas. The procedure is identical under the windowsill.


Behind the gas water heater
It is prohibited to dismantle the gas equipment yourself. But the casing can be removed. You need to glue it so that after its installation there are no “bare” areas left.
Behind the gas stove
Technically, you can glue it if the stove is connected to the gas supply system with a flexible hose. It is prohibited to dismantle rigid pipeline connections on your own.
Under the air conditioner
It makes sense to dismantle the structure and glue it continuously. The main thing is to measure where the holes for the fasteners are. It is not difficult if you insert a toothpick, nail or screw in a screw during gluing.


With a stretch ceiling
Wallpaper can be driven under the guides or glued close to them.
Arch
The elements involved are cut out according to pre-measured templates.


Above the doorway
There will be only one joint. The covering consists of two strips, in which segments are cut out in accordance with the sections of the opening covered with wallpaper.


On the slopes of a door or window
The cut is adjusted tightly to the bend. The corner is mounted using a special profile, which is covered with plaster and remains perfectly flat.
On the staircase
If it is not possible to dismantle the staircase, you will have to measure and cut out each element of the wallpaper to glue the finished fragments.


On an uneven wall or a wall with a ledge
It all depends on the configuration and scale of the problem. Sometimes you have to cut and glue with filigree precision.
On wires
Electrical communications that are not built into the wall should not be glued. It is better to disconnect the cable, make repairs, and then install it in place.
Near sockets and switches
The electricity is turned off. Sockets and switches are dismantled or sealed with masking tape. The wall is pasted over. The places of sockets and switches are cut out with a wallpaper knife.

Behind the pipes
The strip is inserted into the space between the wall and the pipe, without touching the coated side. Then the standard procedure is performed.

Niche
The procedure is identical to wallpapering internal corners. But if the dimensions are small, you will have to measure and prepare the elements in advance.
Beams on the ceiling
The technology is the same as when pasting the ends of partitions, niches and arches.
In an attic with a slope
The order, direction and sequence are the same as when pasting vertical planes.
How long does it take to dry?
Drying time depends on the density of the materials and the temperature in the room. Under normal conditions, in accordance with the type of wallpaper, the time indicated in the table should pass before complete drying:
What can and cannot be done after pasting?
After pasting the wallpaper, consider several general rules to preserve the beauty and durability of the finish. Here are 6 basic tips:
- Do not touch freshly pasted wallpaper until it is completely dry.
- Avoid sudden temperature changes.
- Do not place furniture directly against the wall for the first few days.
- Abstain from using aggressive detergents and avoid getting the wallpaper wet.
- If minor defects appear, they can be easily fixed by replacing them with a piece from the remaining scraps.
- A couple of days after the wallpaper has completely dried, put the sockets and switches back in place. And also install the shelves.
These recommendations will help maintain the quality of the work performed and achieve a long-term positive result. The main thing is to let the coating dry completely.
Following the step-by-step instructions provided and observing the care recommendations, you will be able to successfully paste the wallpaper. It is important to remember about careful preparation and accuracy during the work. This will ensure the durability of the coating.
Tips for Beginners
Those who are doing repairs for the first time need to consider:
- A special adhesive composition has been developed for each type.
- High precision ensures an attractive appearance.
- The presence of bubbles is unacceptable. They are driven out, not pierced.
- It is better to use a specialized tool from the list above.
- Before starting work, carefully study the recommendations and watch the video.
It is important that the surfaces are prepared, and the drying time is sufficient. In this case, the wallpaper will not come off.
Now reading:
- Sidewalk tiles: over 70 photos on paths, porches and steps.
- How to Paint a Fridge Yourself – Tips and Ideas for a Creative Approach
- Eastern cuisine: inspiring ideas and real interior photos
- Comprehensive Guide to Buying a Used Opel Zafira
- Design of a one-room apartment in a Khrushchev building: 10 projects and 71 photos for interior inspiration